Administrators Guide
Get started with Active Directory
Organizing Active Directory in support of CLICK will enhance the effectiveness
of administration and automation of Workspaces.
Adding Groups and Users
In preparation for CLICK, add users and groups. To start, launch your Active
Directory Users and Computers application from your server domain controller.
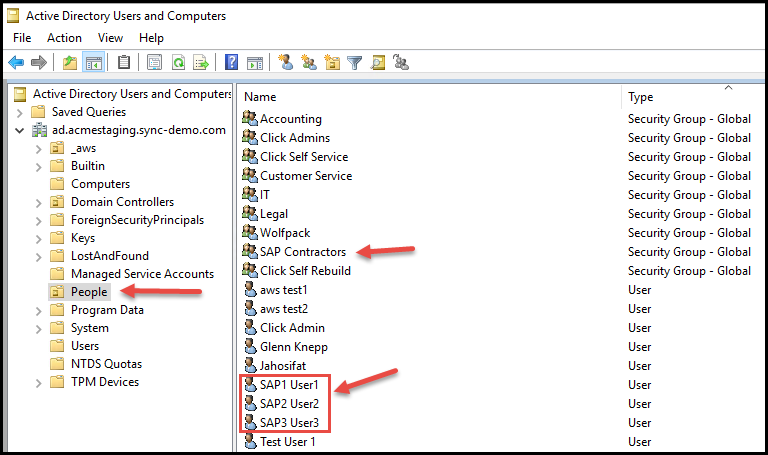
-
Select the Organizational Unit associated with CLICK
-
Create a new Group that will be managed by CLICK
-
Add new users that will be managed by Click
-
Add the new users to the group that is managed by CLICK
Get started with the CLICK Admin Console
Login to the CLICK Admin Console by following the CLICK URL associated with your
organization. Example: https://click.yourcompany.com
Admin Console View
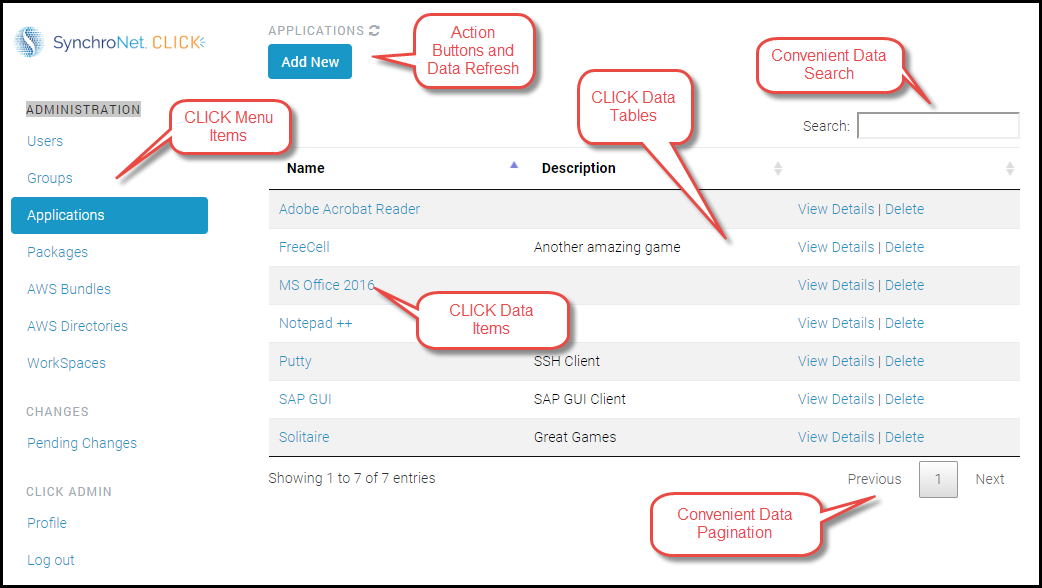
CLICK Menu Items – Shows a list of administrative functions with which to
select.
CLICK Data Tables – Shows a table of data from which an administrator may
interact.
CLICK Data Items – Individual data items for interaction and configuration.
Data Search – A convenient search field with which an administrator may
interact to selectively refine items shown in a data table.
Action Buttons – Action buttons provide a mechanism for which an
administrator may perform an action on the data.
Data Pagination – Provides a mechanism to page through multiple tables of
data.
Data Refresh – A button for updating data in the data table.

Getting Started with Multi-Account / Multi-Region
Add a new AWS Account
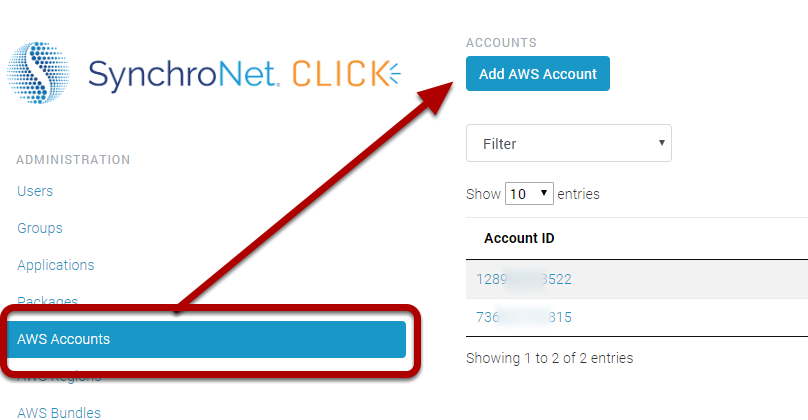
When you add a new account, CLICK provides you the CLICK Role ARNand Trusted
External ID. There's a CFN template that is launched from the customer account
to create the new role. CLICK Role ARN and Trusted External ID are parameters
for that stack, but inside CLICK console, we provide you a link that will
auto-populate.
Add AWS Account
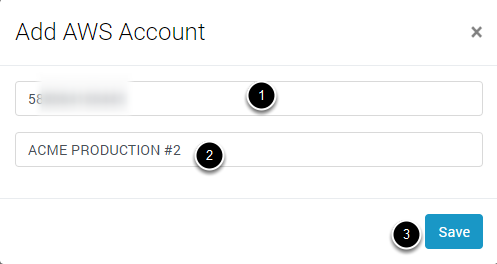
- Enter the account ID
- Enter the Display Name
- Click the Save button
Refresh the New Account Page
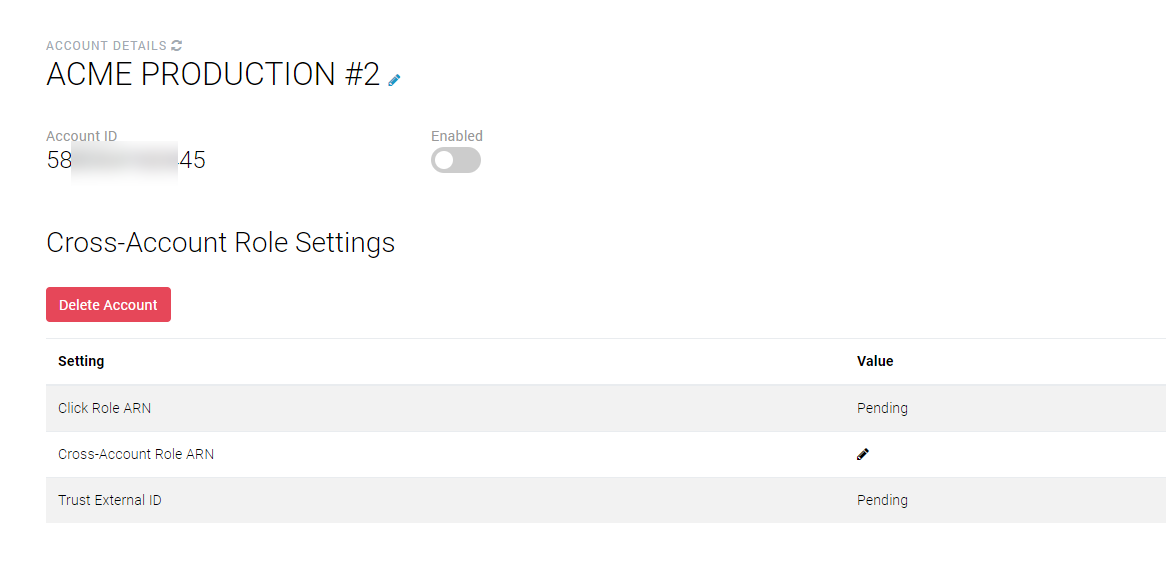
CLICK software will process the new account information.
This process may take some time.
Click the refresh button aside the Account Details label to update the settings
details.
New Account Role Settings
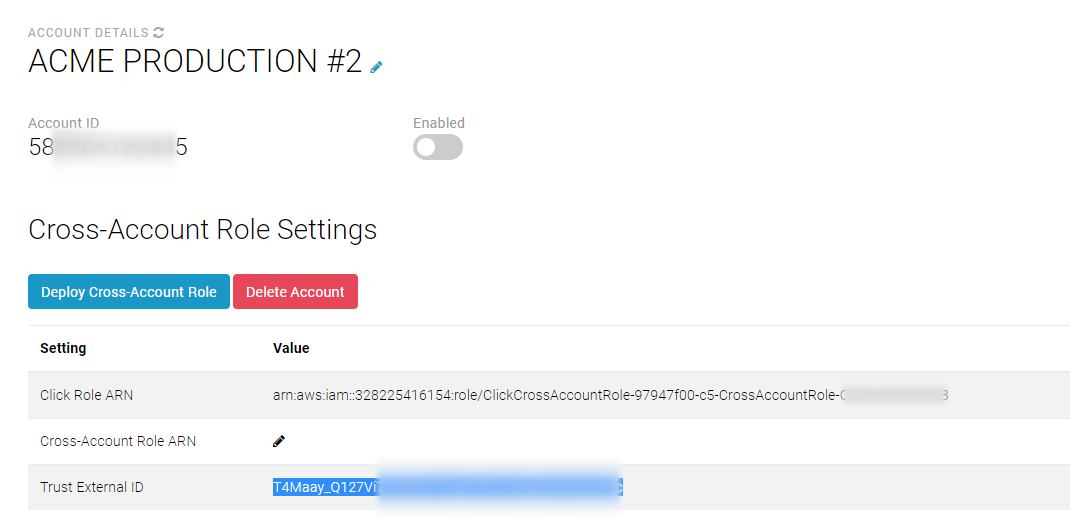
The Cross-Account Role Settings for "CLICK-Role ARN" and "Trust External ID"
values will contain information
Prepare to Click the "Deploy Cross-Account Role" button.
Note: When clicking the Deploy Cross-Account button, this will redirect you to
Amazon's AWS Console. The action requires access permissions to launch AWS
Cloudformation in the new account. Follow the next steps below to prior to
clicking the button.
Open AWS Console
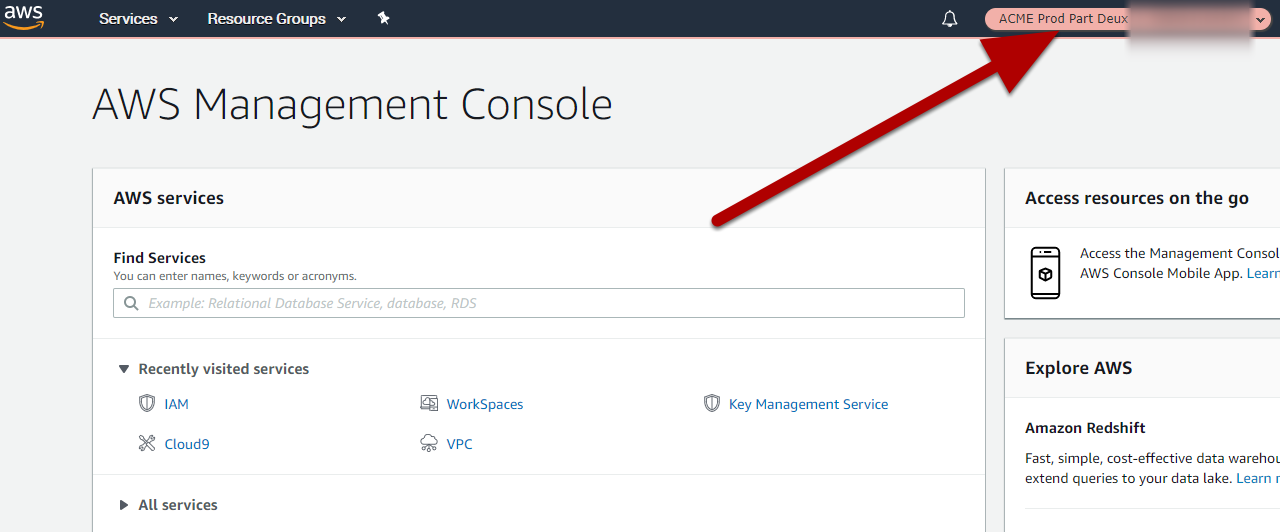
Sign into the account you plan to enable within CLICK.
Note: The user must have permissions to launch AWS Cloudformation stacks.
Deploy Cross Account Role
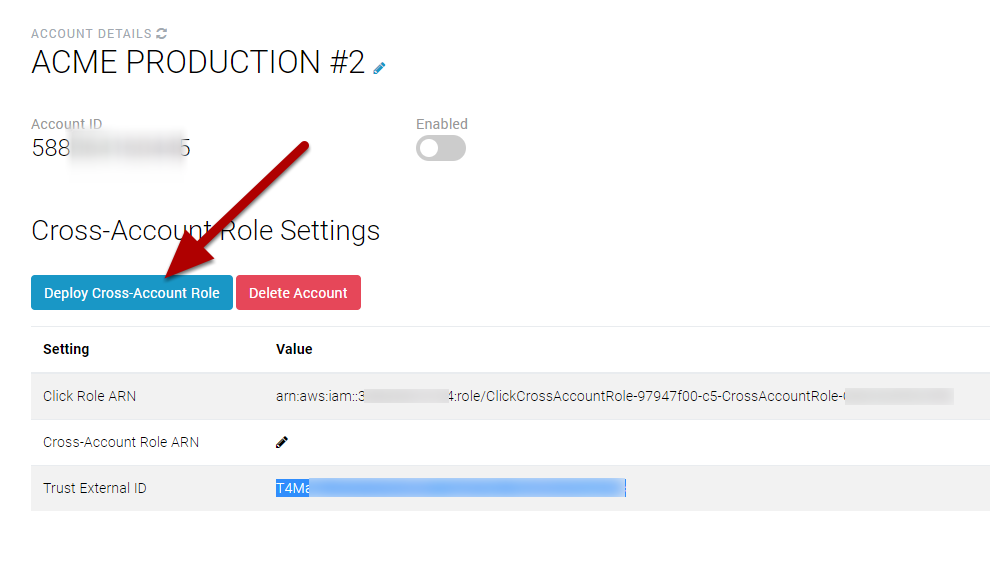
Click the Deploy Cross Account Role
Note: Ensure you are logged into the account
AWS Cloudformation
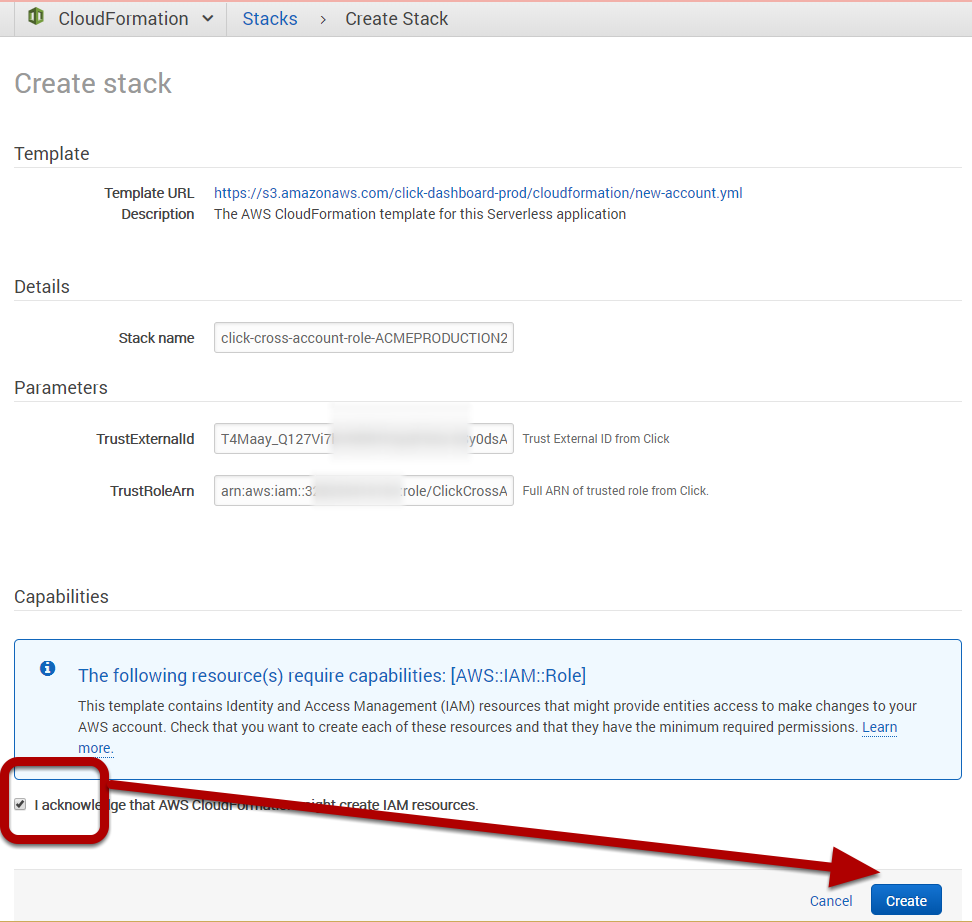
Check the acknowledgement box then click the Create button
Copy Cross Account Role ARN
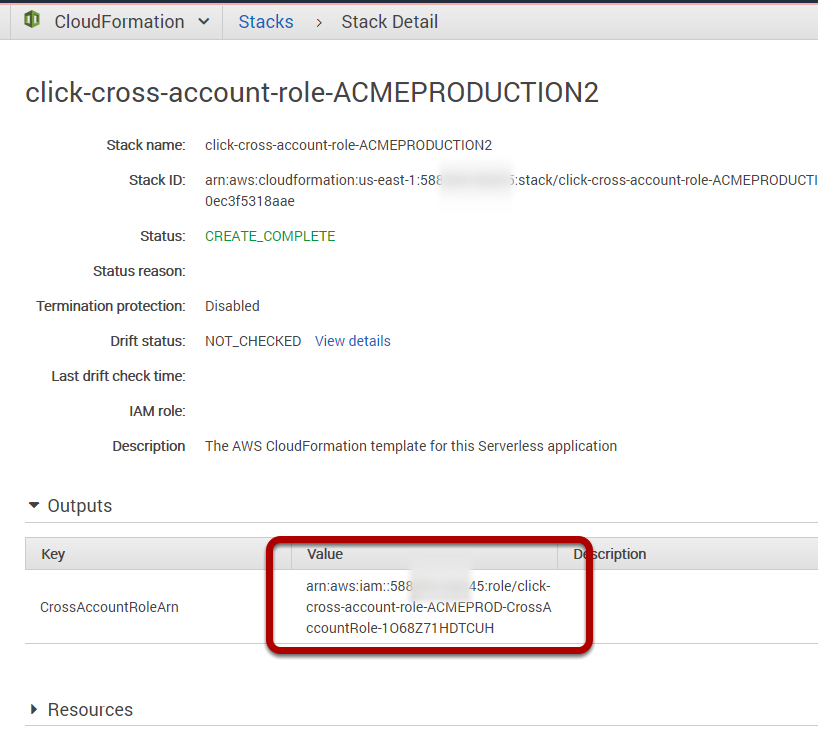
Select and expand the Cloudformation Outputs tab.
Highlight and select the Value of the CrossAccountRoleArn
Paste ARN into edit box
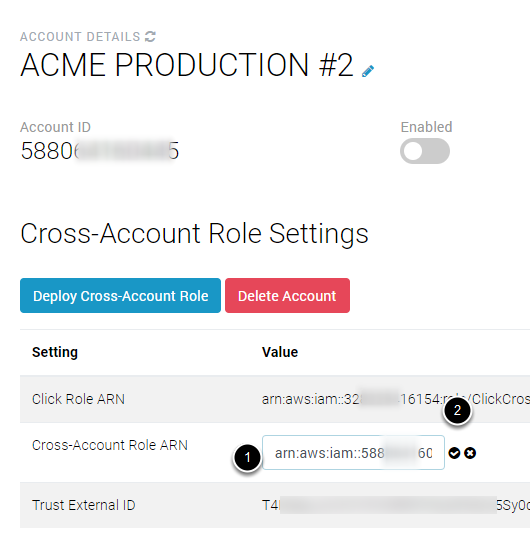
-
Paste the ARN into the Cross-Account Role ARN Edit Box
-
Click the Checkmark to save the ARN
Enable New Account
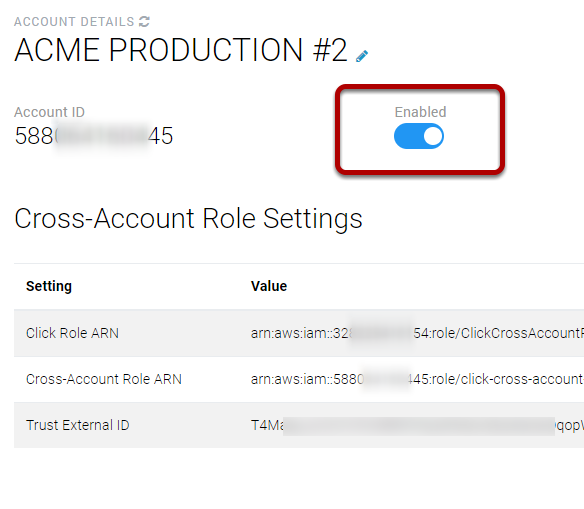
Click the Enabled selector.
Enable AWS Regions
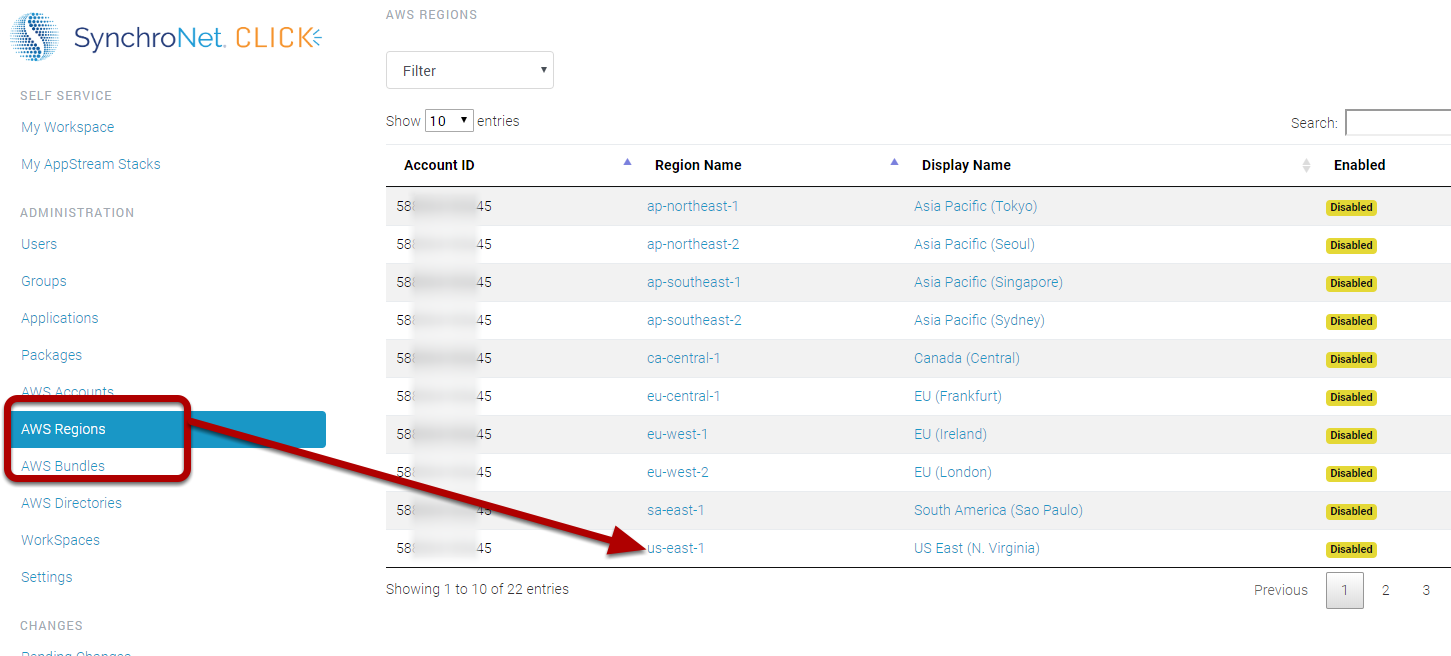
Click the Region Name for the Account.
Select the desired Reqion to enable.
Enable a Region
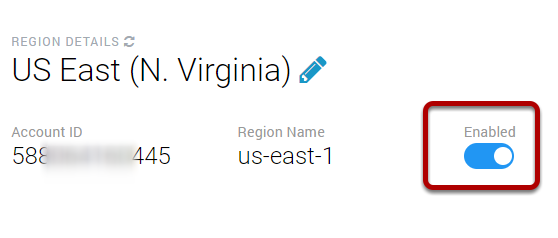
Click the Enabled selector
Manage bundles for the new account
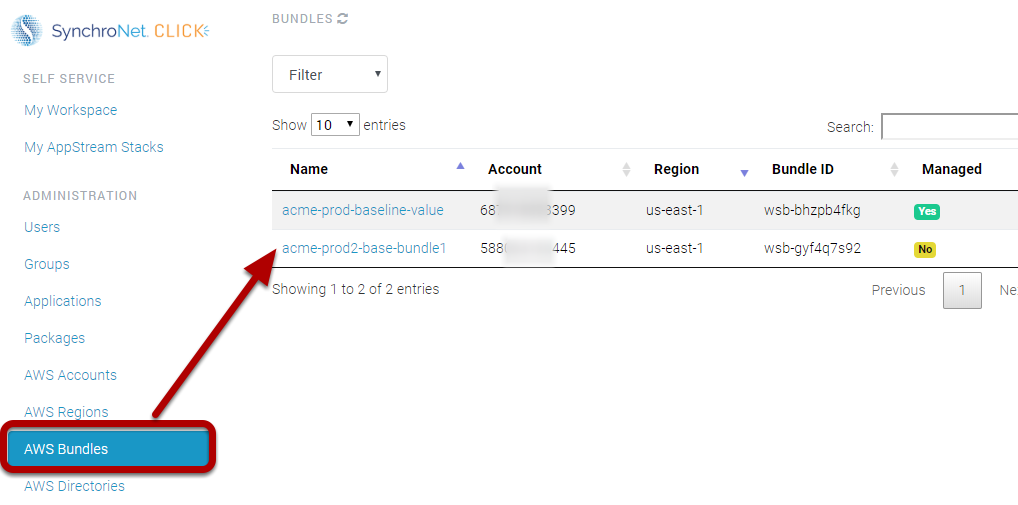
Select AWS Bundles from the CLICK menu.
Click the desired bundle to manage.
Manage the bundle
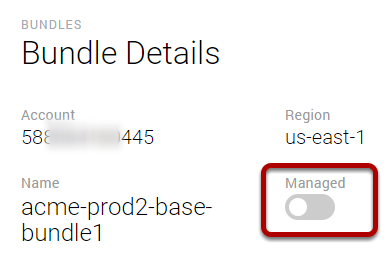
Click the Managed selector button to manage the bundle.
Associate Applications with Bundle
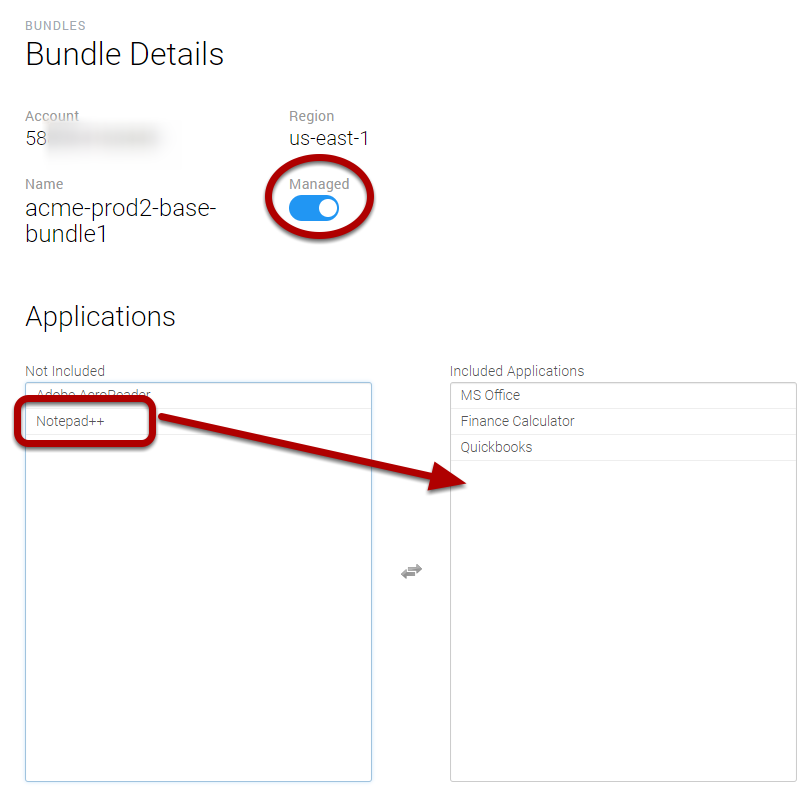
Use the following steps to associate applications with the bundle.
Select the Apps from the "Not Included" box to add to the "Included
Applications" box.
Note: The actions are automatically saved when moved from one field to another.
Manage the AWS Directory for the new account
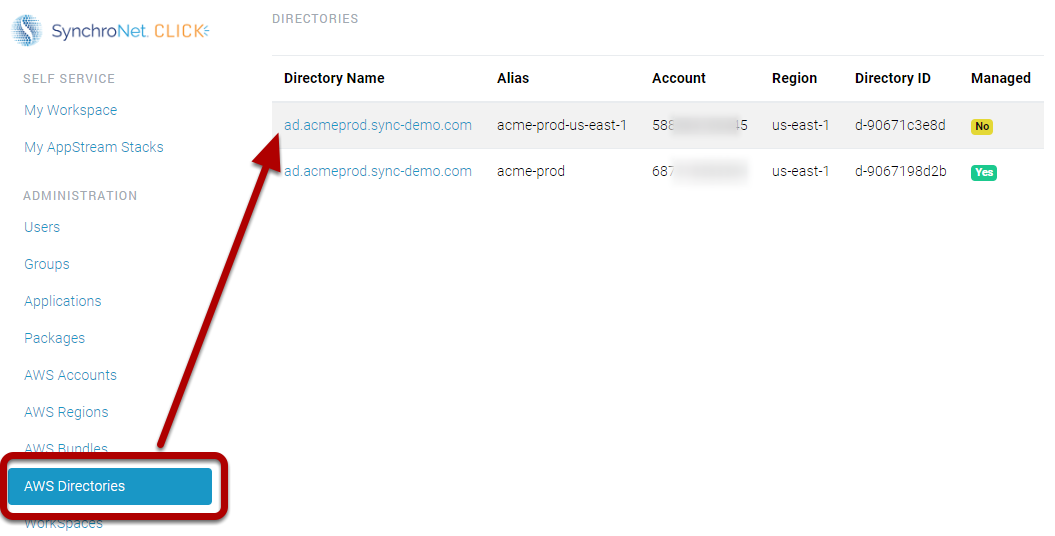
Select AWS Directories from the Menu
Click the directory name that requires management.
Manage the directory
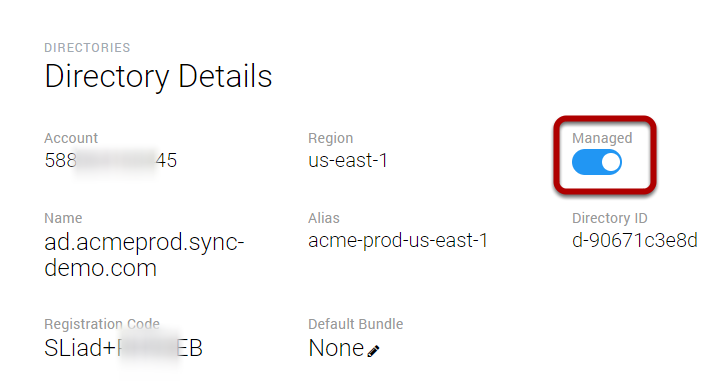
In the directory details page, click the Managed selector button
Note: The new account is now ready for creating packages
Follow the package creation steps in the Packages section of this document.
Get started with Applications in the CLICK Admin Console
Applications in CLICK are used to help assign an appropriate package to a group
of users. Applications are added to facilitate the package association function
to an Amazon Workspace bundle. Bundle assignment is calculated by click based on
the package’s application requirement.
Select Applications from the Menu Items section.
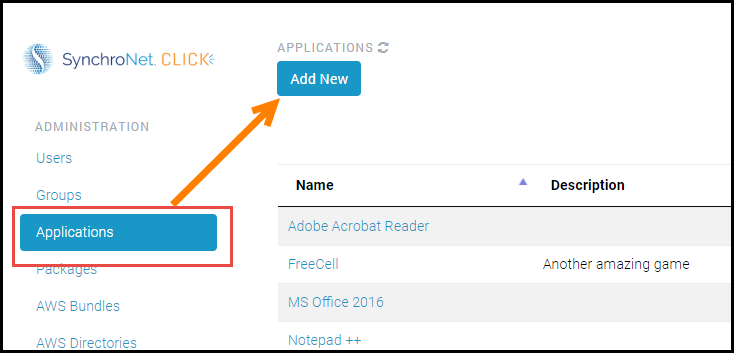
Add a new application
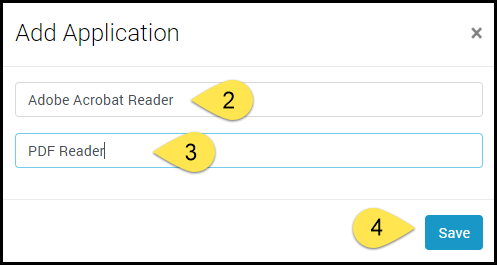
- Click the Add New action button
-
Enter an application name into application field.
-
Enter a description in the description field.
-
Click Save button to save the application information.
Edit the New Application data
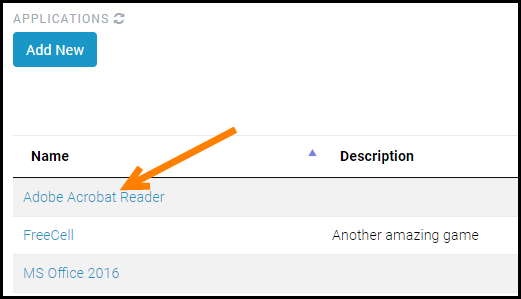
- Click on an application name within the applications table.
-
Click inside the AWS Bundle dropdown field.
-
Select a bundle name from the dropdown to associate the application with the
bundle.
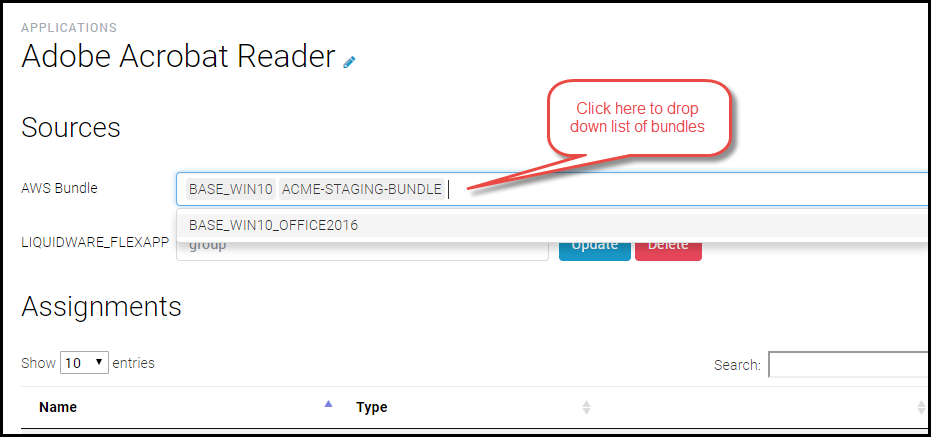
- Data is automatically saved.
Get started with Packages in the CLICK Admin Console
Create repeatable and scalable packages with an image, compute, RAM, encryption,
billing tags and applications. With predefined packages, it will ensure
consistency in provisioning and security controls.
Select Packages from the Menu Items section.
Add a new package
- Click the Create Package button to create a new package.
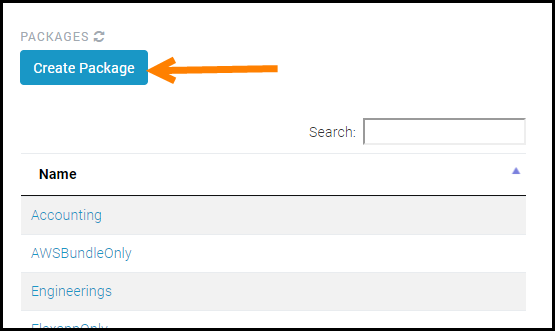
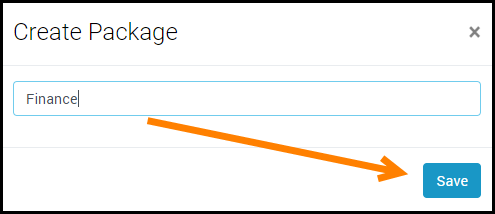
- Enter a package name into package name field then click the Save button.
-
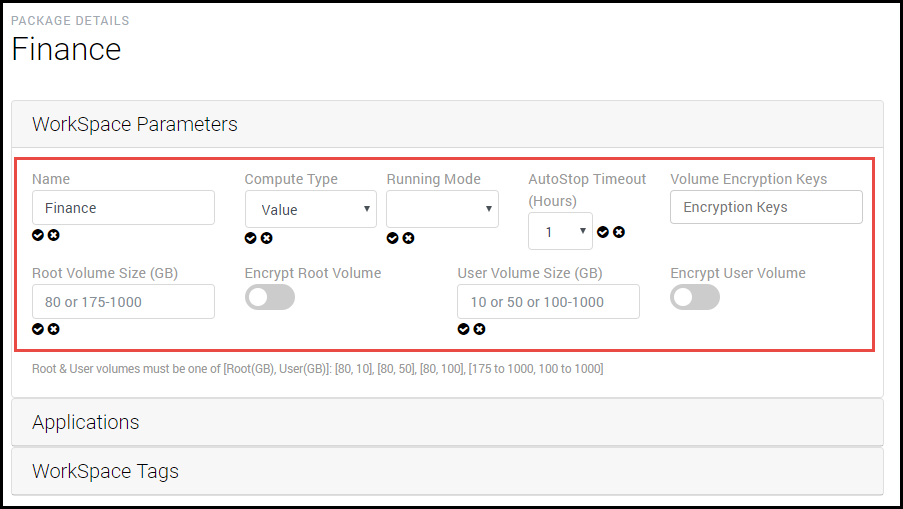
Click the edit button next to the compute type and select an appropriate
compute type for the package. -
Click the "checkmark" next to the compute type field to save the selected
compute type for the package. -
Click the edit button next to the running mode field and select a running
mode from the dropdown list. -
Click the "checkmark" next to the running mode field to save the selected
running mode for the package. -
To enable Volume encryption, there must be at least one Volume Encryption
Key selected. -
To set a Root Volume Size (GB), click the edit button next to the Root
Volume Size, then enter the volume size for the volume. -
Click the checkmark to save.
-
To apply encryption to the root volume, click the encrypt root volume
selector button. NOTE: a volume encryption key is required for this
function. -
To set a User Volume Size (GB), click the edit button next to the User
Volume Size, then enter the volume size for the volume. -
Click the checkmark to save.
-
To apply encryption to the user volume, click the encrypt user volume
selector button. NOTE: a volume encryption key is required for this
function.
-
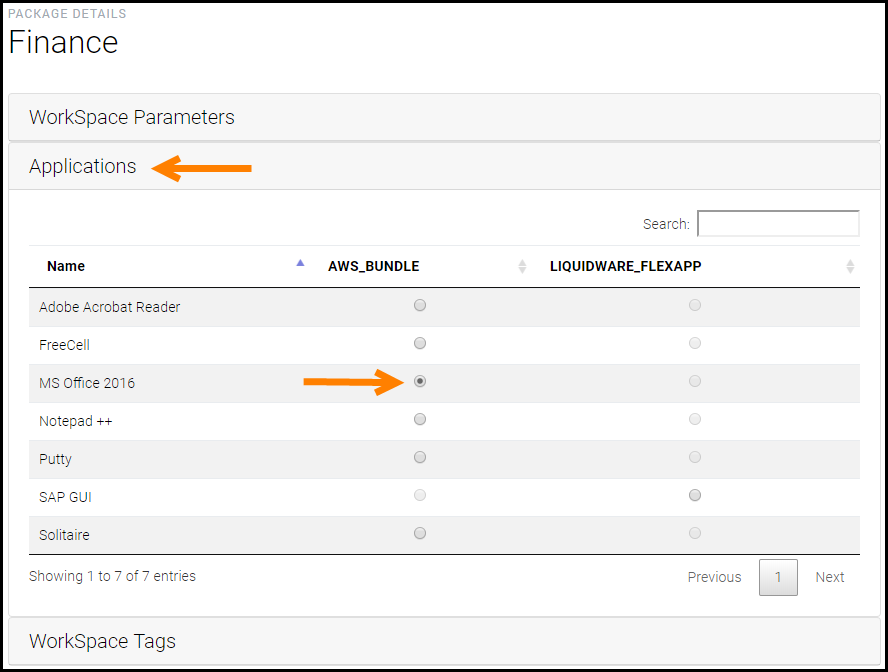
Click the Applications Accordion header.
-
Then select the applications associated with the package by clicking the
radio button(s):- Select from AWS Bundle Column
-
Click the Workspace Tags Accordion header.
-
Enter a new tag key/value pair.
-
Click the Save Tags button to save the tag to the package
-
NOTE: Click the Add Tag button to add more key/value pairs.
Workspace Volumes
The following information details features of setting root and user volumes in
Amazon Workspaces.
- Root & User volumes must be one of the following combinations:
| Root Volume in GB | User Volume in GB |
|---|---|
| 80 | 10 |
| 80 | 50 |
| 80 | 100 |
| 175 – 1000 | 100 - 1000 |
-
You can increase volume sizes once in a 24-hour period.
-
For a newly launched Workspace, you must wait 24 hours before requesting a
larger bundle. -
You can never decrease volume sizes.
Workspace Volume Encryption
-
You cannot encrypt a volume after workspace creation. It must be performed
during creation and launch. -
You cannot change encryption key for an existing volume.
-
You can enable encryption separately between user and root volumes, but they
will always use the same encryption key. -
A running Workspace will not be impacted if you disable the KMS key that was
used to encrypt the user volume of the Workspace. Users will be able to
login and use the Workspace without interruption. However, restarts and
rebuilds of Workspaces that were encrypted using a KMS key that has been
disabled (or the permissions/policies on the key have been modified) will
fail. If the key is re-enabled and/or the correct permissions/policies are
restored, restarts and rebuilds of the Workspace will work again. -
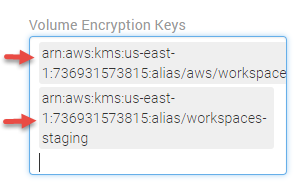
CLICK supports using multiple encryption keys.
- You must first create new encryption keys in your AWS Account.
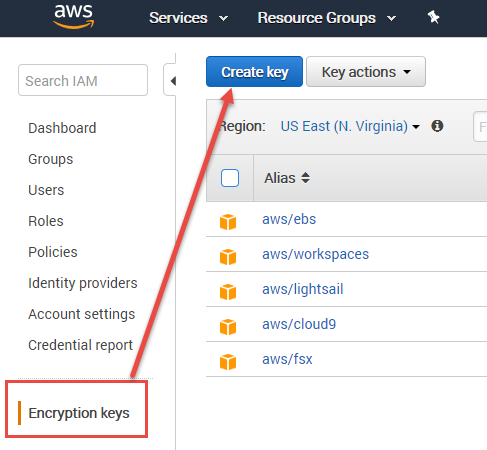
- You will see the new encryption keys available to the CLICK console upon
browser refresh.
Compute Type
-
You can change a Workspace to a larger hardware bundle once in a 24-hour
period. -
You can change to a smaller hardware bundle once in a 30-day period.
-
You can switch between Value, Standard, Performance, or Power (NOTE: not
including Graphics) The following tables show base Windows bundle option
specifications that reflect base pricing:
| Value | Root Volume | User Volume |
|---|---|---|
| 1 vCPU, 2 GiB Memory | 80 GB | 10 GB |
| 1 vCPU, 2 GiB Memory | 80 GB | 50 GB |
| 1 vCPU, 2 GiB Memory | 80 GB | 100 GB |
| 1 vCPU, 2 GiB Memory | 175 GB | 100 GB |
| Standard | Root Volume | User Volume |
| 2 vCPU, 4 GiB Memory | 80 GB | 10 GB |
| 2 vCPU, 4 GiB Memory | 80 GB | 50 GB |
| 2 vCPU, 4 GiB Memory | 80 GB | 100 GB |
| 2 vCPU, 4 GiB Memory | 175 GB | 100 GB |
| Performance | Root Volume | User Volume |
| 2 vCPU, 7.5 GiB Memory | 80 GB | 10 GB |
| 2 vCPU, 7.5 GiB Memory | 80 GB | 50 GB |
| 2 vCPU, 7.5 GiB Memory | 80 GB | 100 GB |
| 2 vCPU, 7.5 GiB Memory | 175 GB | 100 GB |
| Power | Root Volume | User Volume |
| 4 vCPU, 16 GiB Memory | 80 GB | 10 GB |
| 4 vCPU, 16 GiB Memory | 80 GB | 50 GB |
| 4 vCPU, 16 GiB Memory | 80 GB | 100 GB |
| 4 vCPU, 16 GiB Memory | 175 GB | 100 GB |
| PowerPro | Root Volume | User Volume |
| 8 vCPU, 32 GiB Memory | 80 GB | 10 GB |
| 8 vCPU, 32 GiB Memory | 80 GB | 50 GB |
| 8 vCPU, 32 GiB Memory | 80 GB | 100 GB |
| 8 vCPU, 32 GiB Memory | 175 GB | 100 GB |
| Graphics | Root Volume | User Volume |
| 8 vCPU, 15 GiB Memory, 1 GPU, 4 GiB Video Memory | 100 GB | 100 GB |
| GraphicsPro | Root Volume | User Volume |
| 16 vCPU, 122 GiB Memory, 1 GPU, 8 GiB Video Memory | 100 GB | 100 GB |
Running Mode
The running mode of an Amazon WorkSpace determines its immediate availability
and how it is billed. You can choose between the following running modes when
creating a SynchroNet CLICK Package.
-
AutoStop – This mode is used when billed by the hour. When this mode is
selected, WorkSpaces stop after predetermined period of inactivity, but the
state of apps and data is saved. See the reference in this document for
Getting Started with Packages to set the autostop timeout. -
AlwayOn – This mode is used when billed as a fixed monthly fee for unlimited
usage of a WorkSpace. This mode is best for users who use their WorkSpace
full time as their primary desktop.
Modify a running mode
To modify a running mode in a SynchroNet CLICK package, select the Packages menu
item to start.
-
Select the package name.
-
Click the edit button next to the running mode field and select a running
mode from the dropdown list. -
Click the "checkmark" next to the running mode field to save the selected
running mode for the package.
Get started with Groups in the CLICK Admin Console
Select Groups from the Menu Items section.
Synchronize Active Directory Groups
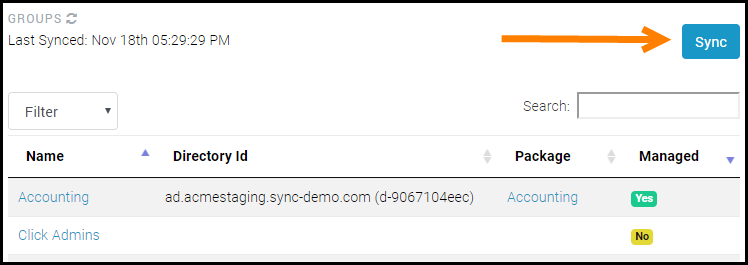
- Click the Sync button to synchronize groups with the Active Directory. Any
new groups that were added in Active Directory will show up in the Group’s
data table. If there are many groups within the Active Directory, they may
not all show in the table at once. To see more entries, use the pagination
buttons to traverse through the Group pages.
Managing a group
Groups in CLICK provides a mechanism in Groups menu to allow for more granular
directories configuration for launching Workspaces. For example, to provide a
user base a CLICK workspaces package, yet have a requirement to separate user
types by Active Directory Organizational Unit, you may select an OU that
contains a different directory for which to launch workspaces. The advantage for
this feature allows you to apply a more restrictive Group Policy to an OU
containing restricted users.
To configure CLICK groups, use the following steps:
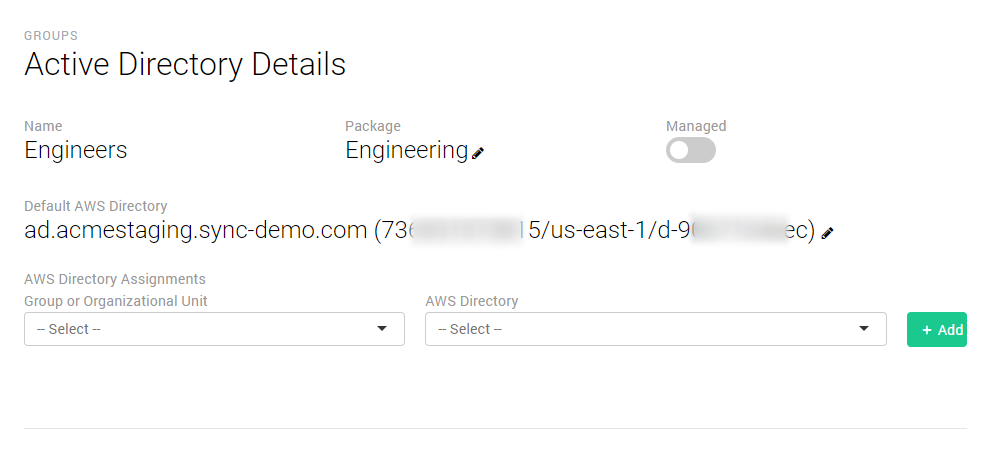
- Click the group that will be managed by CLICK.
- To select a package for the group, Click the edit button next to the Package
field and select a package from the dropdown list. - To save the package for the group, click the "checkmark" beside the dropdown
list. - To associate a default directory with the group, select the edit button next
to the Default AWS Directory field and select a directory from the dropdown
list.- This directory will be used to launch workspaces that do not meet any of
the more granular assignments. As an example, if a user belongs to the
main group and does not belong to another OU or Group assignment, then
the workspace will be launched into the default AWS Directory.
- This directory will be used to launch workspaces that do not meet any of
- To save the directory to the group, click the "checkmark" next to the
dropdown list. - To allow SynchroNet CLICK to manage workspaces for the group, click the
Managed selector button.
Granular AWS Directory assignments
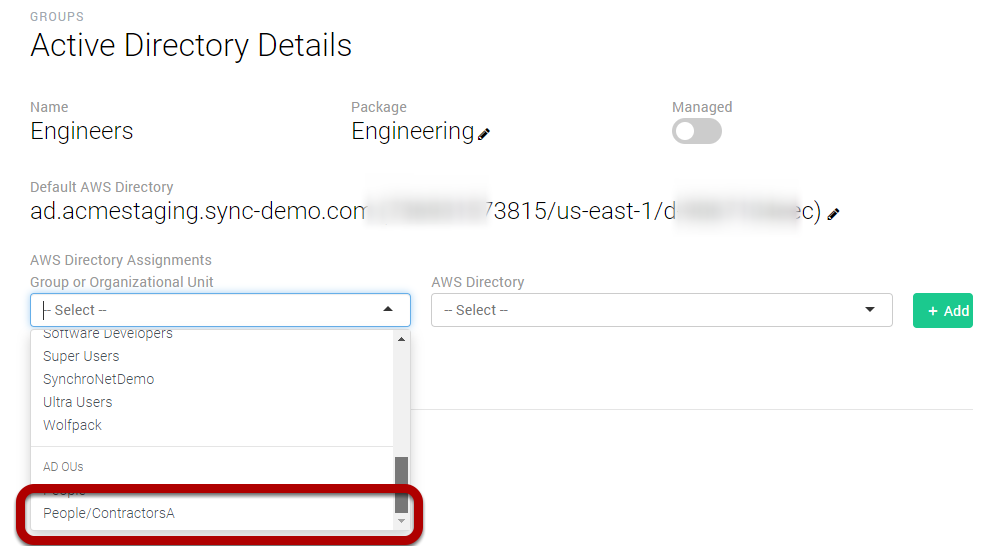
Click the Group or Organizational Unit dropdown to select a group or OU
assignment.
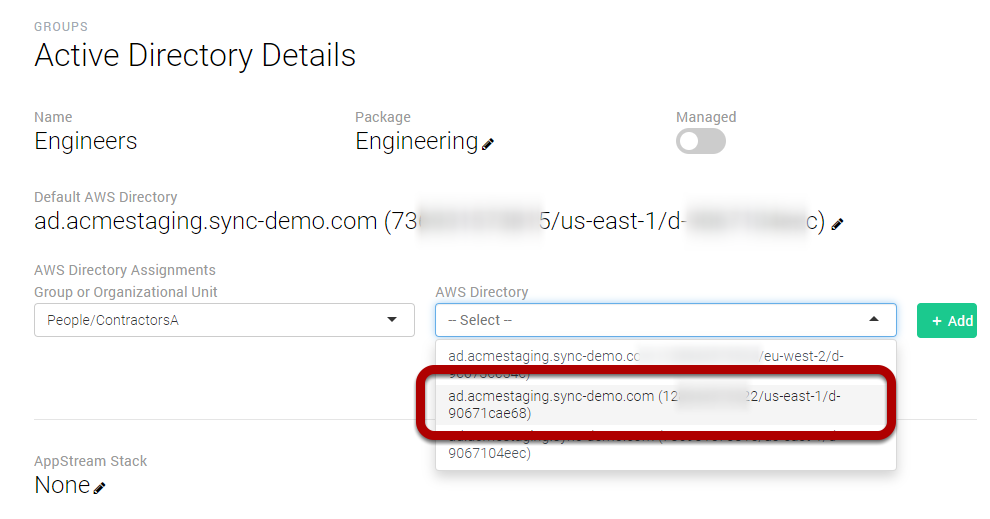
Click the AWS Directory dropdown to associate a directory with the Group or OU
assignment.
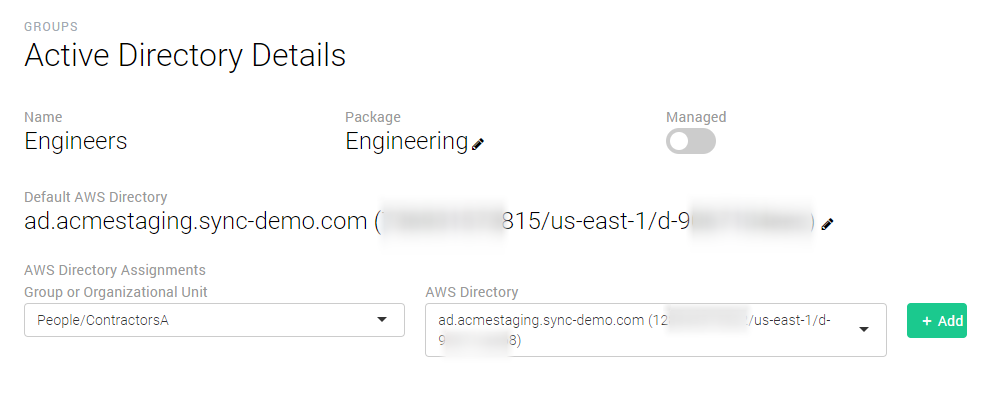
Click the Add button to save the new assignment
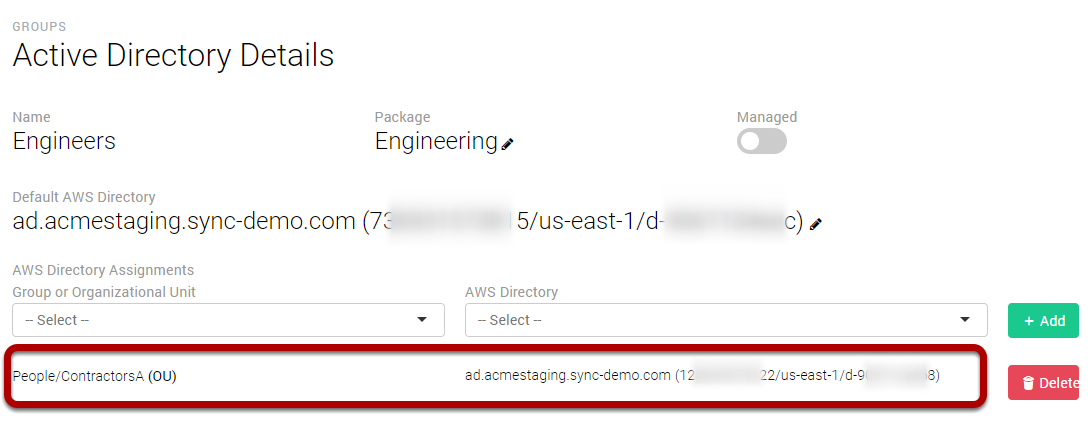
The new assignment is now active and available for launching workspaces.
Get started with AWS Bundles in the CLICK Admin Console
Select AWS Bundles from the Menu Items section.
Edit AWS Bundle Details
-
Click a bundle name from the bundles' table to edit the Bundle Details.
-
To select applications associated with a bundle, click an application name
from within the "Not Included" box. -
To allow click to manage the bundle, click the Managed selector button.
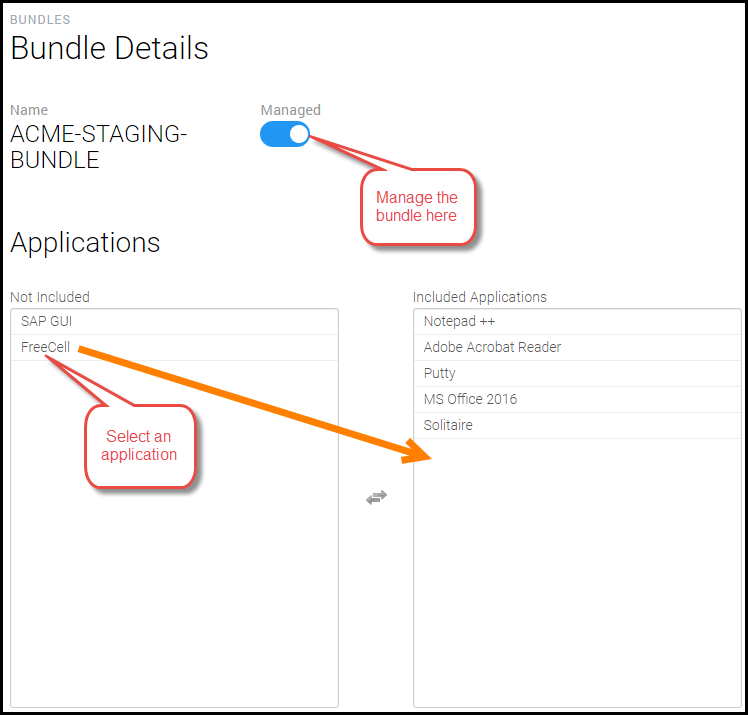
- Data is saved automatically.
Get started with AWS Directories in the CLICK Admin Console
Select AWS Directories from the Menu Items section.
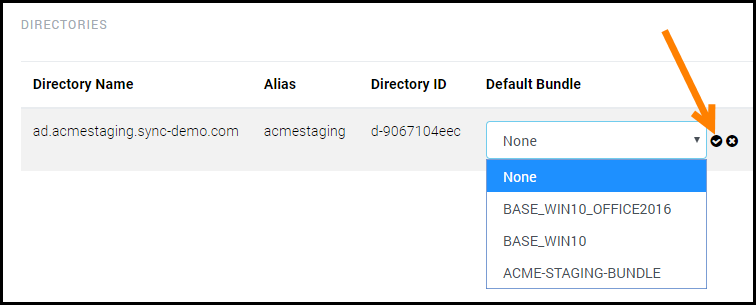
Select default bundle for a workspaces directory
-
Ensure each directory has a default bundle.
-
To select a default bundle:
-
Click the edit button beside the Default Bundle text field
-
Select a bundle from the drop-down list
-
Click the checkmark to save the bundle.
-
Get started with Users in the CLICK Admin Console
Select Users from the Menu Items section.
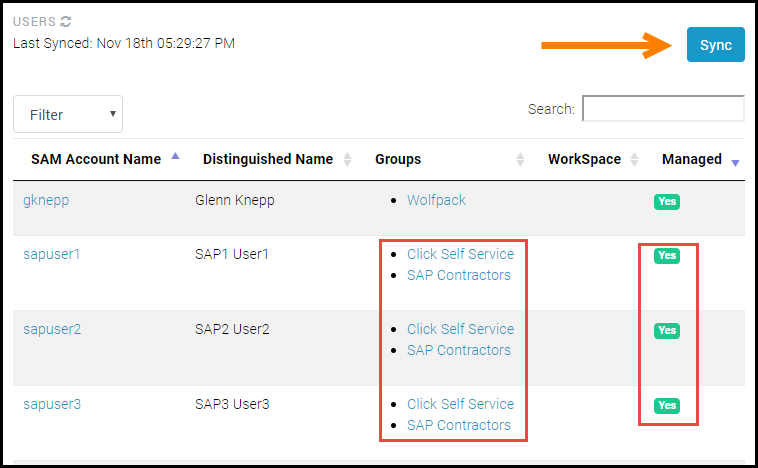
Synchronize with Active Directory
- Click the Sync button to synchronize any new users or groups from Active
Directory. Performing this action will automatically refresh the data table.
Note: Data may take some time to actually refresh. Click the Sync button
again if the table does not show the updated data.
Verify Users
-
Verify the user(s) exist in the Users table and they are associated with the
correct Groups -
Verify the users are managed by CLICK.
User Overrides for WorkSpace Parameters
When assigned to a group managed by SynchroNet CLICK, users inherit the
attributes of a WorkSpaces based on the Package that was selected and associated
with the group. The Workspace attributes may be overridden per user. Perform the
following steps to override a user’s WorkSpace parameters:
-
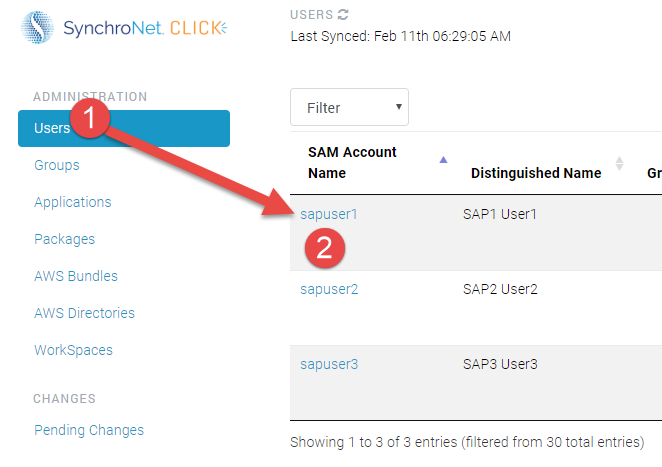
Select the Users menu item in the CLICK Console.
-
Select the user from the user data table.
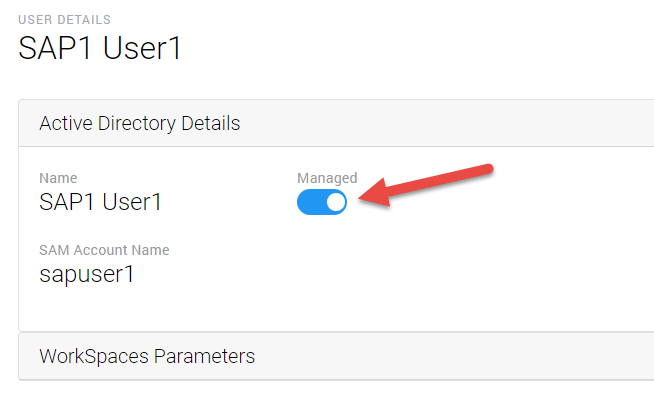
- To unmanage a user click the Managed selector within the Active Directory
Details accordion section to make it change from blue to gray.
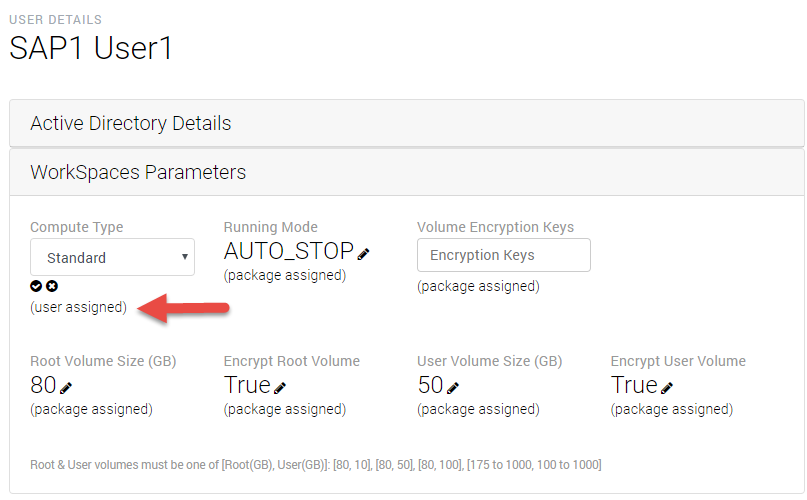
- To override a user’s individual WorkSpace parameters, use the accordion to
open the WorkSpaces Parameters section. Select an edit button next to any of
the parameters to change its attributes. Click the checkmark to save the
attribute. To identify an attribute has been overridden for the user, a
signifier located adjacent to the attribute in parentheses will change from
(package assigned) to (user assigned).
Get started with Pending Changes in the CLICK Admin Console
Select Pending Changes from the Menu Items section.
Launch Workspaces
-
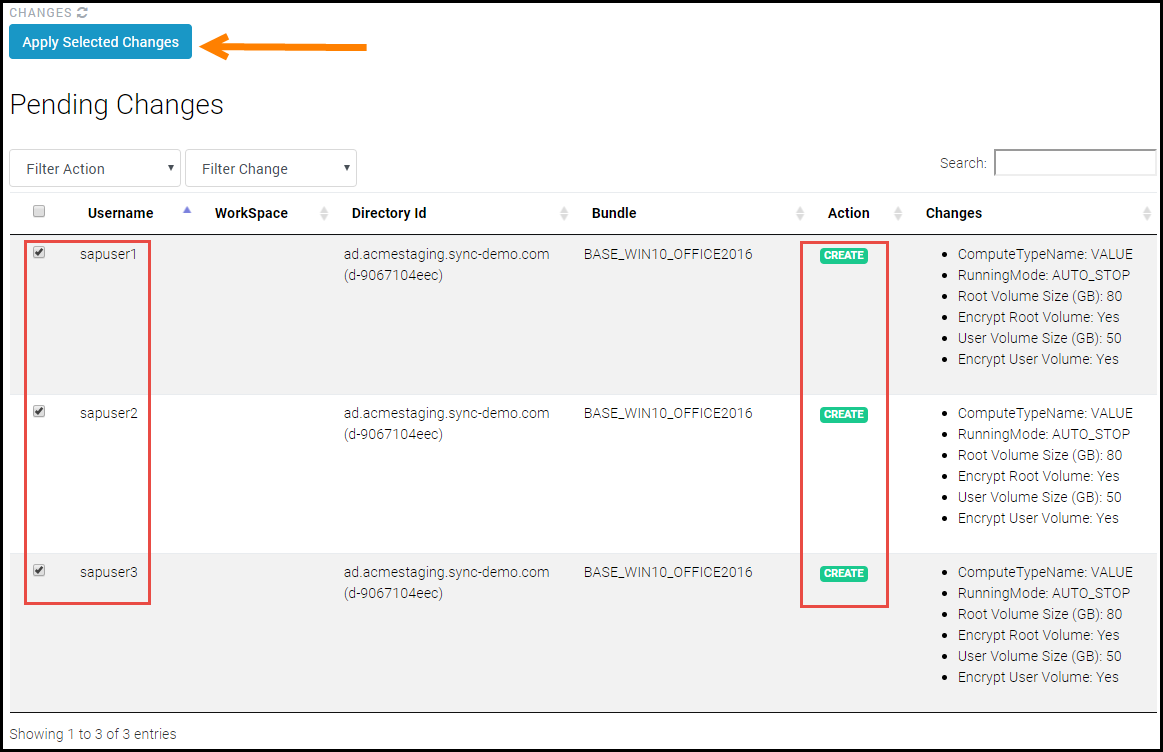
Verify the users are pending create action.
-
Click the checkbox next to the username in the table header.
-
Click Apply Selected Changes. This will start the workspace creation for the
selected users.
Get started with Workspaces in the CLICK Admin Console
Select Workspaces from the Menu Items section.
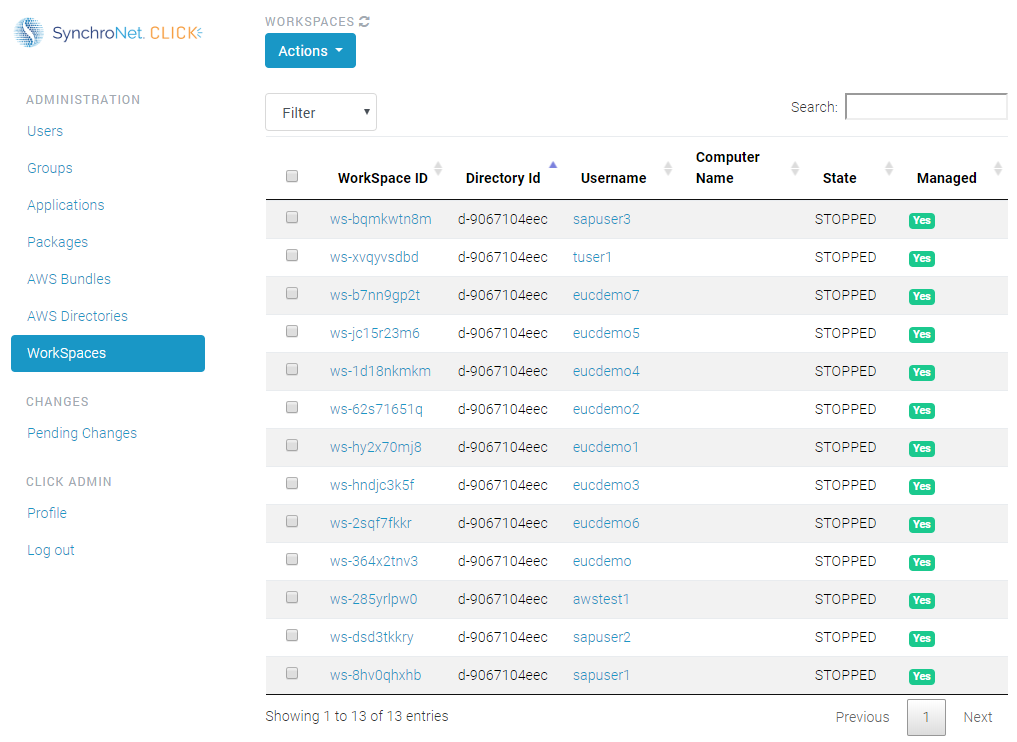
The workspaces data table contains detailed information related to the
workspaces in an AWS inventory. The information about a specific workspace may
be show by selecting the workspace ID link from the table.
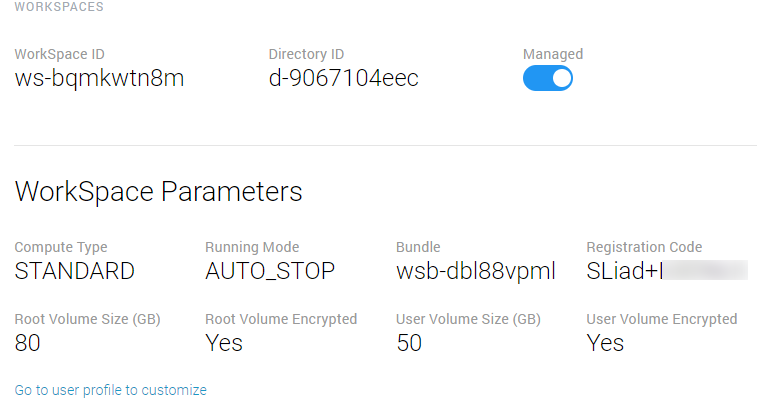
Click the workspace ID link to view the workspace parameters for a workspace.
Manage a workspace
WorkSpaces that were created outside of the CLICK console or prior to the
deployment of CLICK into an AWS account will not be recognized by CLICK as a
managed Workspace. To manage a WorkSpace from the CLICK console that was created
outside of the CLICK console, perform the following steps:
-
Select the WorkSpaces menu item.
-
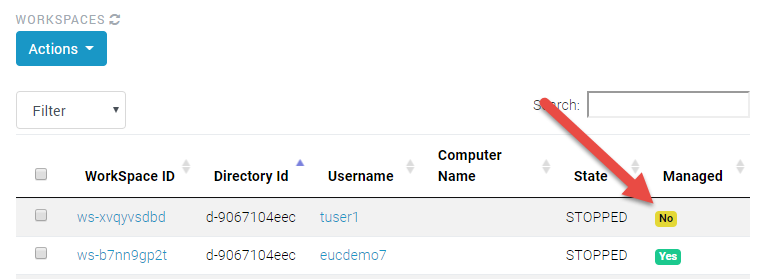
Select the WorkSpace to manage. Notice the Managed column in the WorkSpaces
data table should show No.
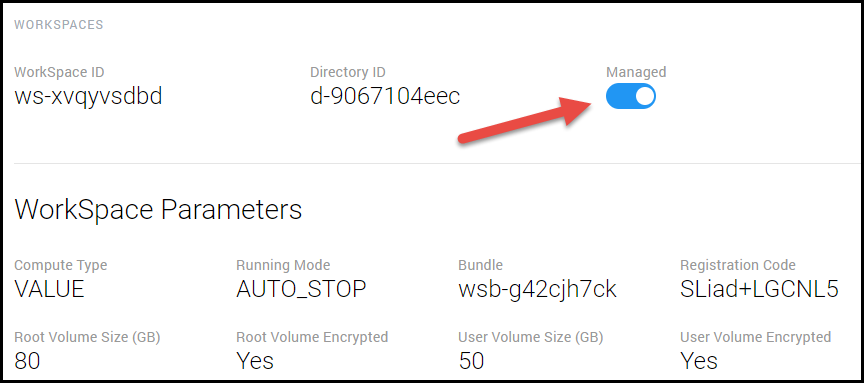
- Click the managed selector button to change the unmanaged WorkSpace to
Managed.

Reboot, Rebuild, Start, Stop or Terminate
To perform an action on a Workspace, follow the steps below.
-
Select the WorkSpaces menu item then select one or more checkboxes to select
Workspace(s) on which to perform an action. -
Select the Actions dropdown list.
-
Select the action to perform on the workspace.
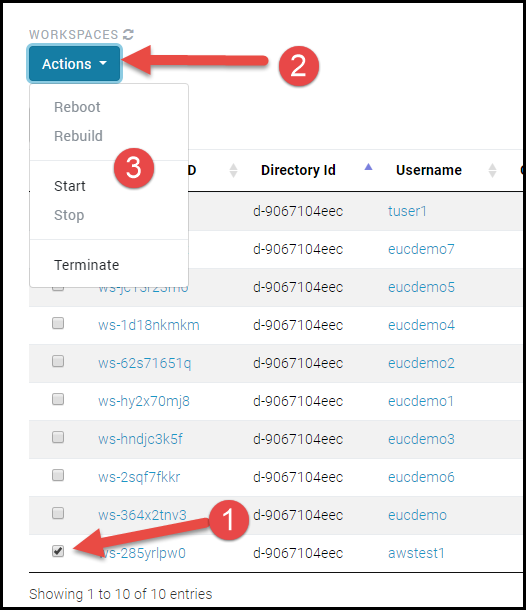
Note: If a workspace is terminated from the Workspaces data table as represented
above in the image, CLICK will attempt to recreate the WorkSpace for the user if
the Group with which the user is associated remains Managed by CLICK. To
terminate a WorkSpace permanently, the user must be removed from the Group in
Active Directory, or the entire Group must be un-managed from within CLICK. A
special consideration is given to the destructive nature of terminating
WorkSpaces from within CLICK. Even when automation is enabled (automatically
applying new or modification changes), CLICK will always require manual
administrator intervention to terminate a WorkSpace.
Off Boarding Users
When users no longer require a workspace, CLICK administrators may off board a
user.
The process of removing a user and subsequently terminating their workspace
requires access to Active Directory as follows:
-
Login to Active Directory Users and Computers
-
Remove a user from a group that is managed by CLICK
-
Login to the CLICK console, select the Users menu
-
Click the SYNC button
-
Select the Pending Changes menu in the CLICK console
-
The user’s WorkSpace will be put into a Stop state then a Terminate
state -
Note: As mentioned in an earlier section of this document, terminating a
WorkSpace is a destructive action that will require Administrator
intervention. Select the user in the Pending Changes data table, then
click Apply Selected Changes to terminate the WorkSpace.
-
Off Boarding a Group Users
When a group of users, such as contractors, no longer require a workspace, CLICK
administrators may off board a group of users.
The process of removing a group and subsequently terminating their workspace is
a straight forward action as follows:
-
Login to the CLICK console, select the Groups menu
-
Select the managed Group associated with the group of users requiring
termination -
Click the blue Managed toggle button and it should turn gray
-
Select the Pending Changes menu in the CLICK console
-
The user’s WorkSpace will be put into a Stop state then a Terminate
state -
Note: As mentioned in an earlier section of this document, terminating a
WorkSpace is a destructive action that will require Administrator
intervention. Select the user in the Pending Changes data table, then
click Apply Selected Changes to terminate the WorkSpace.
-
Updated about 5 years ago
