FAQs
The sections below outline a number of frequently asked questions regarding SynchroNet CLICK. If you still have unanswered questions reach out to us [email protected]
Sections
- AWS FAQs
- CLICK Overview
- Active Directory
- CLICK Deployment
- Login Troubleshooting
- Performance and Connectivity
- CLICK Configuration
- CLICK Features
- CLICK Support
- Marketplace
AWS
What is Root Volume?
The following information details features of setting root and user volumes in
Amazon Workspaces.
- Root & User volumes must be one of the following combinations:
| Root Volume in GB | User Volume in GB |
|---|---|
| 80 | 10 |
| 80 | 50 |
| 80 | 100 |
| 175 – 1000 | 100 - 1000 |
- You can increase volume sizes once in a 24-hour period.
For a newly launched Workspace, you must wait 24 hours before requesting a
larger bundle.You can never decrease volume sizes.
What are AWS compute types?
You can switch between Value, Standard, Performance, or Power (NOTE: not including Graphics) The following tables show base Windows bundle option specifications that reflect base pricing:
| Value | Root Volume | User Volume |
|---|---|---|
| 1 vCPU, 2 GiB Memory | 80 GB | 10 GB |
| 1 vCPU, 2 GiB Memory | 80 GB | 50 GB |
| 1 vCPU, 2 GiB Memory | 80 GB | 100 GB |
| 1 vCPU, 2 GiB Memory | 175 GB | 100 GB |
| Standard | Root Volume | User Volume |
| 2 vCPU, 4 GiB Memory | 80 GB | 10 GB |
| 2 vCPU, 4 GiB Memory | 80 GB | 50 GB |
| 2 vCPU, 4 GiB Memory | 80 GB | 100 GB |
| 2 vCPU, 4 GiB Memory | 175 GB | 100 GB |
| Performance | Root Volume | User Volume |
| 2 vCPU, 7.5 GiB Memory | 80 GB | 10 GB |
| 2 vCPU, 7.5 GiB Memory | 80 GB | 50 GB |
| 2 vCPU, 7.5 GiB Memory | 80 GB | 100 GB |
| 2 vCPU, 7.5 GiB Memory | 175 GB | 100 GB |
| Power | Root Volume | User Volume |
| 4 vCPU, 16 GiB Memory | 80 GB | 10 GB |
| 4 vCPU, 16 GiB Memory | 80 GB | 50 GB |
| 4 vCPU, 16 GiB Memory | 80 GB | 100 GB |
| 4 vCPU, 16 GiB Memory | 175 GB | 100 GB |
| PowerPro | Root Volume | User Volume |
| 8 vCPU, 32 GiB Memory | 80 GB | 10 GB |
| 8 vCPU, 32 GiB Memory | 80 GB | 50 GB |
| 8 vCPU, 32 GiB Memory | 80 GB | 100 GB |
| 8 vCPU, 32 GiB Memory | 175 GB | 100 GB |
| Graphics | Root Volume | User Volume |
| 8 vCPU, 15 GiB Memory, 1 GPU, 4 GiB Video Memory | 100 GB | 100 GB |
| GraphicsPro | Root Volume | User Volume |
| 16 vCPU, 122 GiB Memory, 1 GPU, 8 GiB Video Memory | 100 GB | 100 GB |
- You can change a Workspace to a larger hardware bundle once in a 24-hour\
period.
- You can change to a smaller hardware bundle once in a 30-day period.
What is the difference in running modes?
The running mode of an Amazon WorkSpace determines its immediate availability and how it is billed. You can choose between the following running modes when creating a SynchroNet CLICK Package.
-
AutoStop – This mode is used when billed by the hour. When this mode is selected, WorkSpaces stop after predetermined period of inactivity, but the state of apps and data is saved.
-
AlwayOn – This mode is used when billed as a fixed monthly fee for unlimited usage of a WorkSpace. This mode is best for users who use their WorkSpace full time as their primary desktop.
CLICK Overview
What is a CLICK instance?
A CLICK Tenant Instance, or CLICK Instance, is a single deployment of CLICK. Customers can have one CLICK Instance or multiple. One great use case for having multiple CLICK Instances is to use one as a staging area for testing advanced configurations or new features.
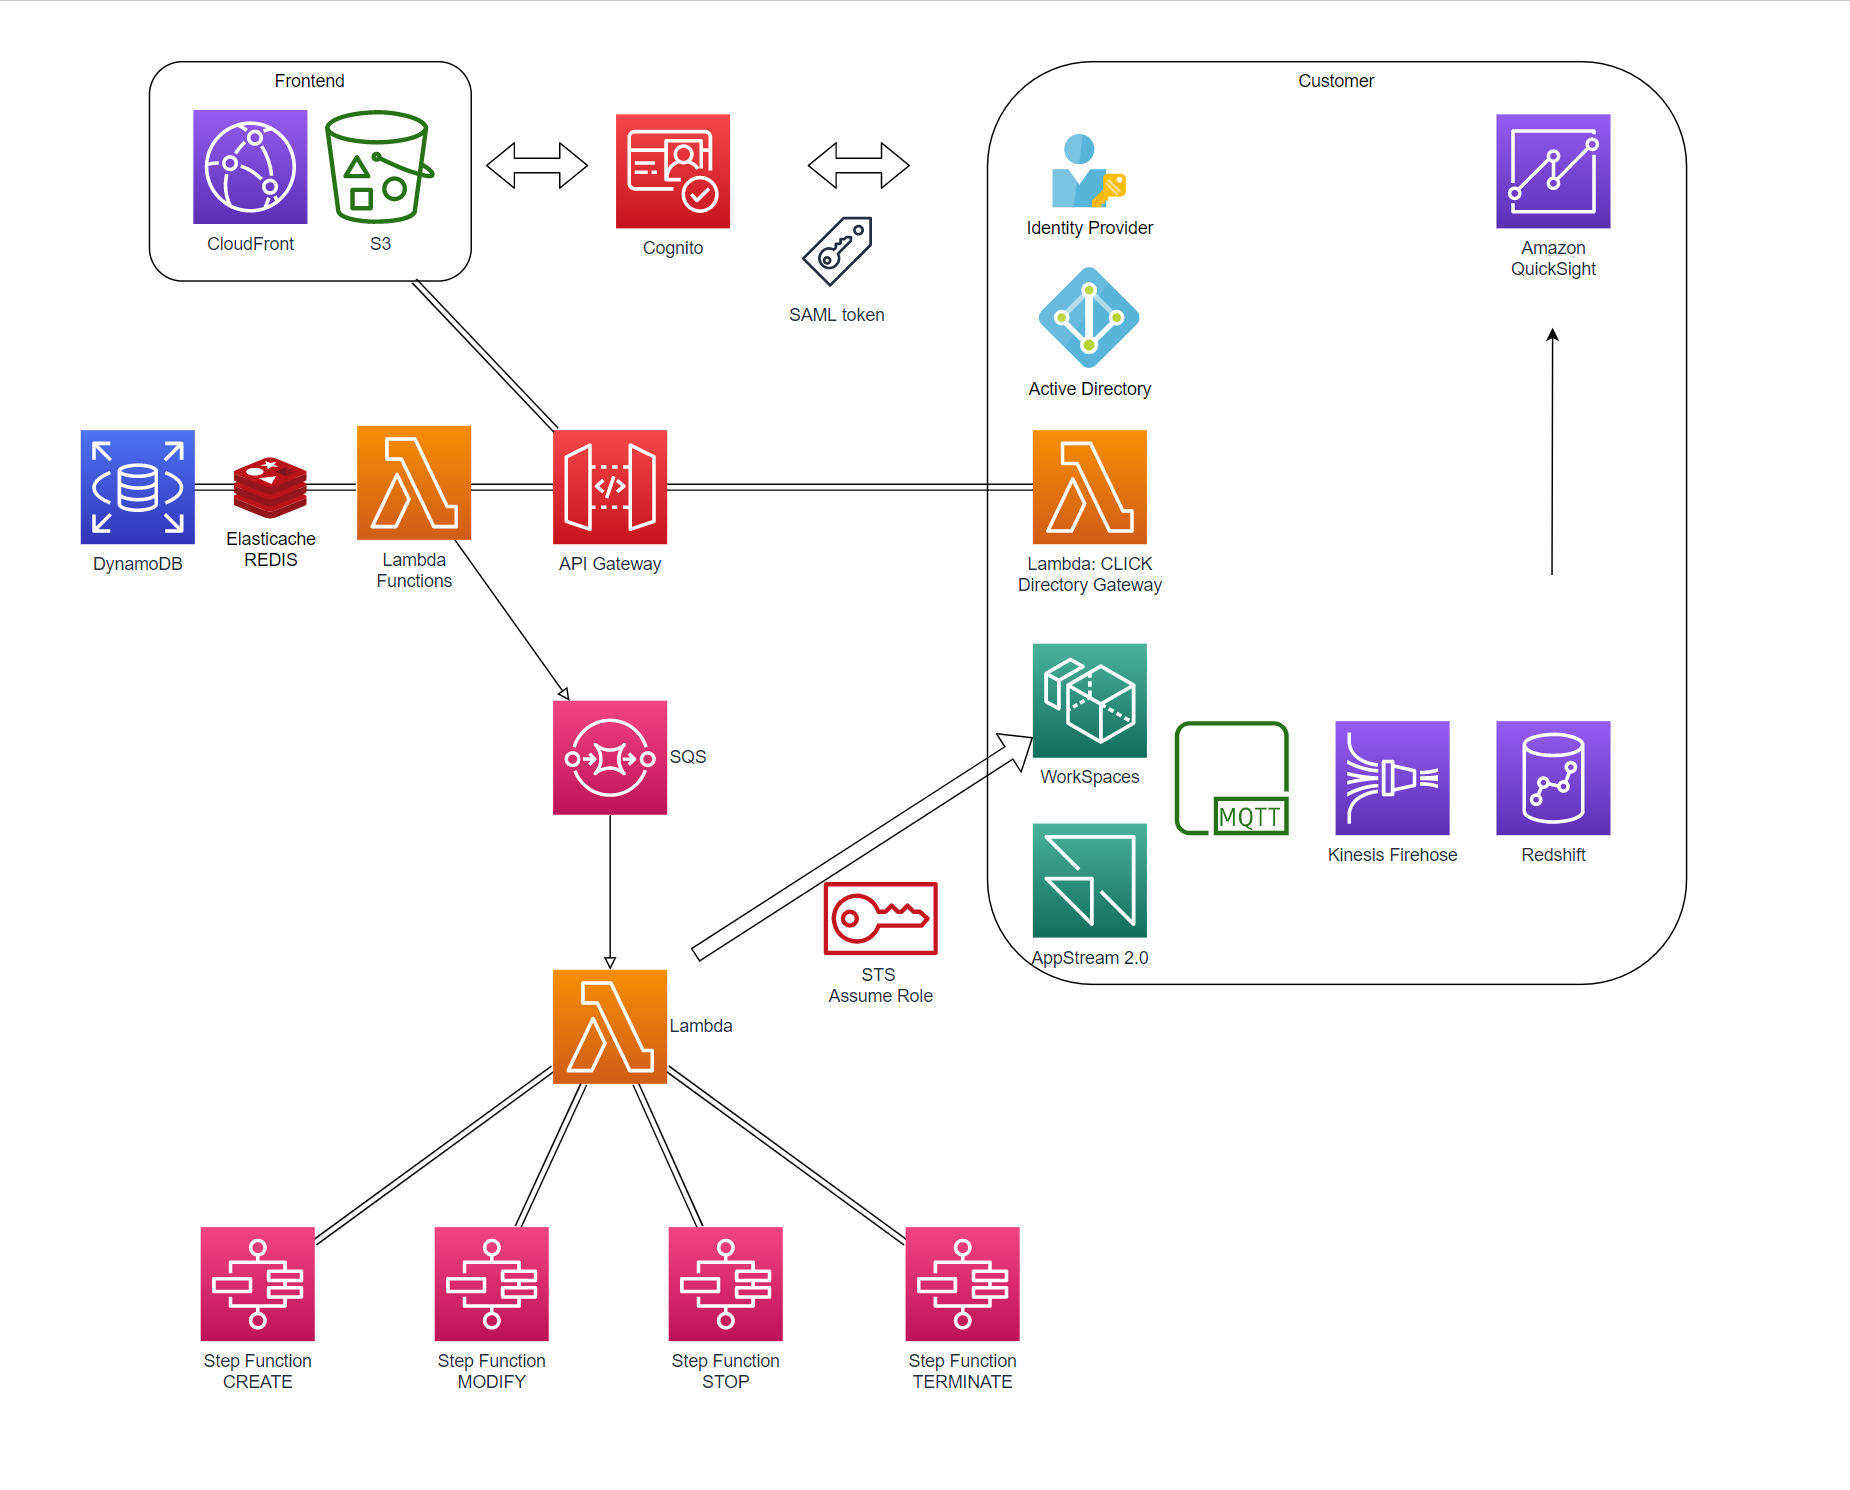
What is CLICK's Architecture?
CLICK is built on AWS-native services to provide performance, scalability, and security.
Active Directory
What are the Active Directory properties stored by CLICK?
The tables below detail the minimum (and default) set of properties that CLICK captures from Active Directory objects. Some advanced use cases may require configuring the CLICK AD Gateway to include additional properties. This can be done by modifying the `AdExtraAttributes` parameter in the [AD Gateway Stack Parameters](doc:ad-gateway-stack-parameters).
Active Directory Users
  <th>
    Used For
  </th>
</tr>
  <td>
    Uniquely identifying Users
  </td>
</tr>

<tr>
  <td>
    `displayName`
  </td>

  <td>
    Display
  </td>
</tr>

<tr>
  <td>
    `distinguishedName`
  </td>

  <td>
    Display
  </td>
</tr>

<tr>
  <td>
    `userPrincipalName`
  </td>

  <td>
    Linking authentication information with the User
  </td>
</tr>

<tr>
  <td>
    `sAMAccountName`
  </td>

  <td>
    WorkSpace provisioning requests and linking Users to their WorkSpaces
  </td>
</tr>

<tr>
  <td>
    `userAccountControl`
  </td>

  <td>
    Determining if a user is enabled or disabled (The CLICK AD Gateway does not send the full value, only a boolean to indicate enabled/disabled)
  </td>
</tr>

<tr>
  <td>
    `memberOf`
  </td>

  <td>
    Determining Group and OU memberships
  </td>
</tr>

<tr>
  <td>
    `mail`
  </td>

  <td>
    E-mail correspondence with the User
  </td>
</tr>
| Property |
|---|
| `objectGUID` |
Active Directory Security Groups
  <th>
    Used For
  </th>
</tr>
  <td>
    Uniquely identifying Groups
  </td>
</tr>

<tr>
  <td>
    `distinguishedName`
  </td>

  <td>
    Display, identifying AppStream groups
  </td>
</tr>

<tr>
  <td>
    `name`
  </td>

  <td>
    Display
  </td>
</tr>
| Property |
|---|
| `objectGUID` |
Active Directory Organizational Units (OUs)
  <th>
    Used For
  </th>
</tr>
  <td>
    Uniquely identifying OUs
  </td>
</tr>

<tr>
  <td>
    `distinguishedName`
  </td>

  <td>
    Uniquely identifying OUs
  </td>
</tr>

<tr>
  <td>
    `name`
  </td>

  <td>
    Display
  </td>
</tr>
| Property |
|---|
| `objectGUID` |
How do I find an Active Directory Group's GUID?
You can find the `objectGUID` value for an Active Directory group using the Attribute Editor in the Active Directory Users and Computers (ADUC) console snapin.
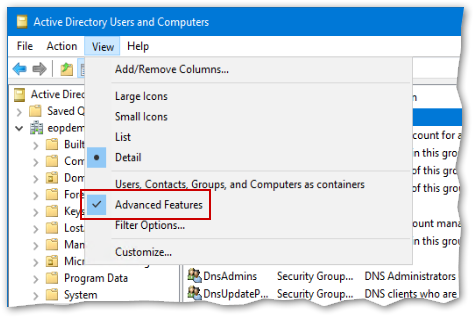
1. Ensure Advanced Functionality is Enabled
The Attribute Editor is part of ADUC's advanced functionality. You can see it is enabled by going to the view menu and looking for a check mark next to the Advanced Features item.
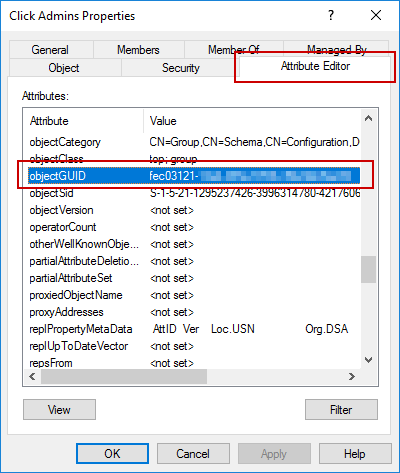
2. Find the objectGUID
Open the properties dialog of the Active Directory group whose objectGUID you need to find, and navigate to the Attribute Editor tab. In this list, in alphabetical order, you can find the objectGUID value for the group.
3. Copy the objectGUID to the Clipboard
Unfortunately, the Attribute Editor doesn't provide a way to copy the objectGUID value. To capture the objectGUID, you'll need to perform a few extra steps.
- Find the group's Distinguished Name in the Attribute Editor.
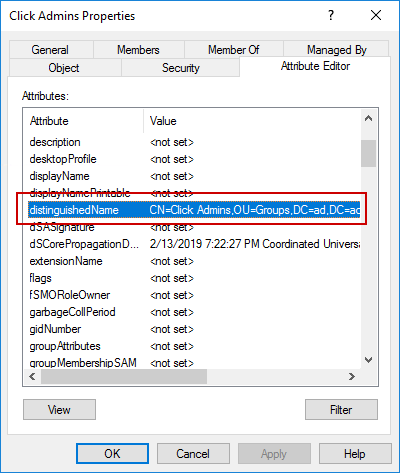
- Double click on the entry to bring up the String Attribute Editor window, then copy the entire string.
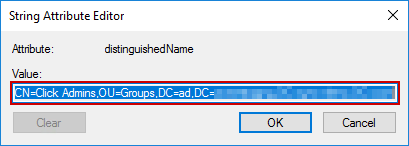
- Run the following PowerShell code snippet, replacing
__value__with the Distinguished Name you just copied.
Get-ADObject -Identity "__value__" | Select-Object -Property ObjectGUID
You can now easily copy the objectGUID from the output of the PowerShell code above.
The CLICK portal doesn't reflect current data from AD?
Using the CLICK dashboard, go to User/Groups and select the **SYNC **option to the top right of the portal.
CLICK Deployment
What are the connectivity requirements for the subnet used by the CLICK AD Gateway?
The subnet you choose for the CLICK AD Gateway to use must satisfy these requirements:
- Have a route to your Active Directory Domain Controller - Every subnet is associated with a route table which controls IP ranges that can be reached by network interfaces on the subnet. The CLICK AD Gateway must be deployed on a subnet that has a route to your Active Directory Domain Controller in order for it the two to communicate.
- Have a route to the Internet - The CLICK AD Gateway securely sends information back to CLICK to enable CLICK to provision and maintain resources for your users. This is not possible without internet connectivity.
- Allow outbound Internet traffic on port 443 - The CLICK AD Gateway uses port 443 when communicating with CLICK, so any Network ACLs in place on the subnet you choose must allow outbound traffic on this port.
Are AWS Security Groups the same thing as an Active Directory Security Group?
No. In AWS, a security group is a networking concept. Security Groups are used by virtual network interfaces like a virtual firewall to control inbound and outbound traffic. While preparing to deploy the CLICK AD Gateway, it's important to select or create an appropriate security group to allow the AD Gateway Lambda function to have the correct network access.
What network access must be granted by the security group used by the CLICK AD Gateway?
Since security groups are like virtual firewalls, it's important to ensure that traffic is allowed on the correct ports. The security group used by the AD Gateway requires the following in terms of connectivity:
- Allow outbound requests on your LDAP port - The AD Gateway Lambda function initiates requests to your Active Directory Domain Controller. That means it must be able to make outgoing requests on that port. Standard LDAP deployments use port 389, or port 636 for secure LDAP.
- Allow outbound requests on port 443 - The CLICK AD Gateway securely sends information back to CLICK on port 443, so outbound traffic must be allowed on this port.
How do I use MFA (Multi-Factor Authentication) with CLICK?
CLICK integrates with the Okta, ADFS and Auto0. For instructions on this setup, please refer here for more information on using a SAML IdP with CLICK.
Login Troubleshooting
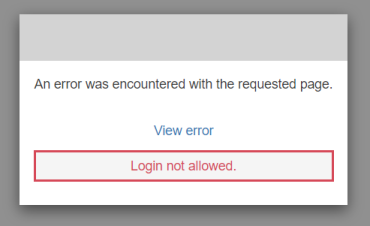
I am unable to login to the CLICK portal?
- Clear your browsers cache history
- Contact your system administrator and make sure your account is active
I don't see the ability to use my self-service options?
- Contact your CLICK System Administrator and ensure you are assigned to the correct Active Directory Security Group
Performance and Connectivity
WorkSpace is performing slowly.
If you're experiencing performance issues in WorkSpaces, use the following troubleshooting steps for remediation:
(RF = Recommended Fix)
(CM= Click Portal)
Slow workspace environment
- RF: Check for recent AV scans/run Programs > Accessories > Tools > Disk Cleanup
Workspace starts fast and slows over time throughout day/week
- RF: Reboot workspace at least bi-monthly to apply applicable updates
- CP: Dashboard > Workspaces > Actions > Reboot
High CPU usage shortly after Windows starts
- RF: Check for pending or recent Windows Updates changes
Screen tearing between device environment
- RF: Check device bandwidth/connection strength
Workspace connects but can't handle 3D rendering
- RF: Increase compute type to next echelon (cost)
- CM: Dashboard > Users > WorkSpaces Parameters
WorkSpace won't connect to my network or internet.
If experiencing connectivity issues in WorkSpaces, use the following troubleshooting steps for remediation:
(RF = Recommended Fix)
(CM= Click Portal)
Workspace displays as 'Unhealthy'
- RF: Wait 2-3 mins then reboot (repeat up to 2 times as required)
- CM: Dashboard >WorkSpaces> Actions > Reboot
WorkSpaces client timed out on establishing connection
- RF: Verify connection health
https://status.aws.amazon.com/
https://clients.amazonworkspaces.com/Health.html
WorkSpace displays availability as 'Error'
- RF: Contact SynchroNet Support Services for back end support.
My WorkSpace is not showing local peripherals (printers/scanners/media)?
De-register AWS client from GUI then re-register
- Select Gear Wheel on top right if using Windows to connect.
- Use top left options if using Mac to connect.
My WorkSpace loaded but I am missing applications?
From the CLICK dashboard, reboot the device (wait approx. 5-10 mins before logging in again).
In the CLICK portal map to: Dashboard > Workspaces > Actions > Reboot
CLICK Configuration
How to create volume encryption keys?
- You cannot encrypt a volume after workspace creation. It must be performed during creation and launch.
-
You cannot change encryption key for an existing volume.
-
You can enable encryption separately between user and root volumes, but they will always use the same encryption key.
-
A running Workspace will not be impacted if you disable the KMS key that was used to encrypt the user volume of the Workspace. Users will be able to login and use the Workspace without interruption. However, restarts and rebuilds of Workspaces that were encrypted using a KMS key that has been disabled (or the permissions/policies on the key have been modified) will fail. If the key is re-enabled and/or the correct permissions/policies are restored, restarts and rebuilds of the Workspace will work again.
-
CLICK supports using multiple encryption keys.
- You must first create new encryption keys in your AWS Account.
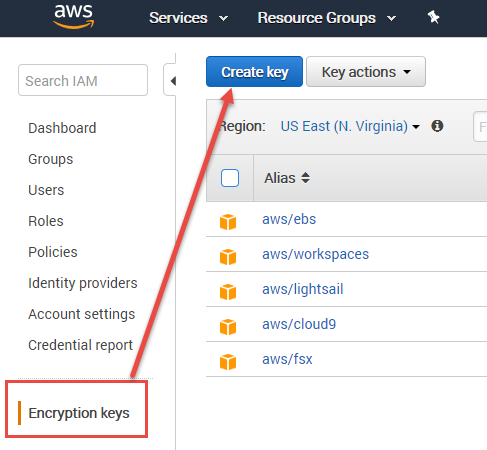
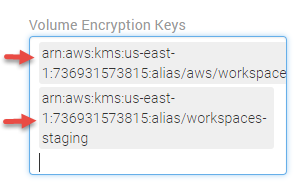
- You will see the new encryption keys available to the CLICK console upon
browser refresh.
Where can I find email template variables?
Click here to see all dynamic variables for CLICK sent emails.
I created a WorkSpace in the AWS console, how do I get CLICK to manage it?
WorkSpaces that were created outside of the CLICK console or prior to the deployment of CLICK into an AWS account will not be recognized by CLICK as a managed Workspace. To manage a WorkSpace from the CLICK console that was created outside of the CLICK console, perform the following steps:
-
Select the WorkSpaces menu item.
-
Select the WorkSpace to manage. Notice the Managed column in the WorkSpaces data table should show No.
-
Click the managed toggle button to change the unmanaged WorkSpace to Managed.
How do I override workspace parameters for a user?
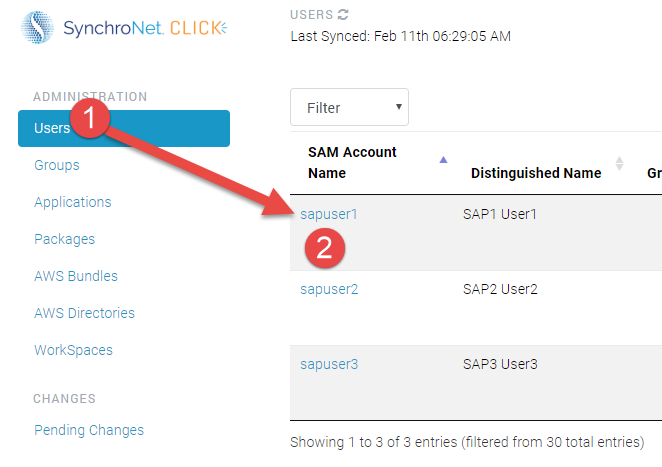
When assigned to a group managed by SynchroNet CLICK, users inherit the attributes of a WorkSpaces based on the Package that was selected and associated with the group. The Workspace attributes may be overridden per user. Perform the following steps to override a user’s WorkSpace parameters:
-
Select the Users menu item in the CLICK Console.
-
Select the user from the user data table.
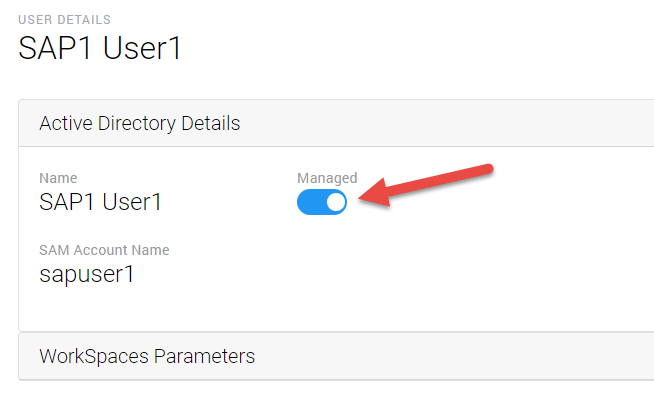
- To unmanage a user click the Managed toggle button within the Active Directory Details accordion section to make it change from blue to gray.
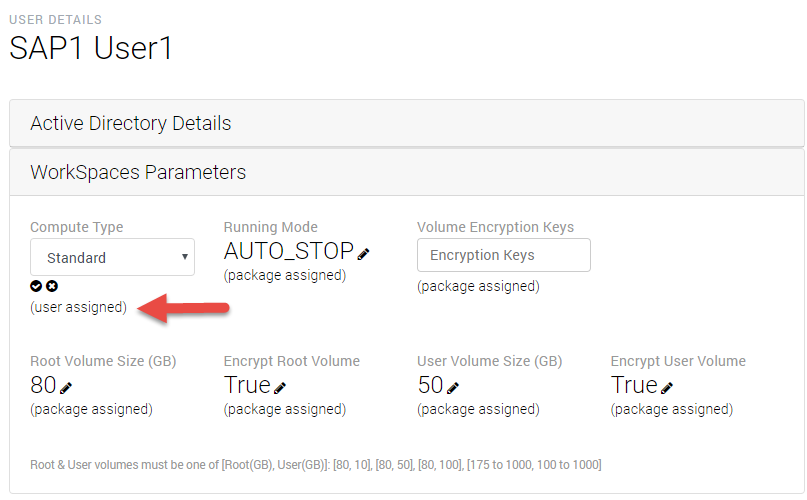
- To override a user’s individual WorkSpace parameters, use the accordion to open the WorkSpaces Parameters section. Select an edit button next to any of the parameters to change its attributes. Click the checkmark to save the attribute. To identify an attribute that has been overridden for the user, a signifier located adjacent to the attribute in parentheses will change from (package assigned) to (user assigned).
How do I disable automatic email invites?
- In the CLICK Dashboard, navigate to the Email Delivery settings, click the edit icon next to the Send Automatic WorkSpace Invite Emails setting.
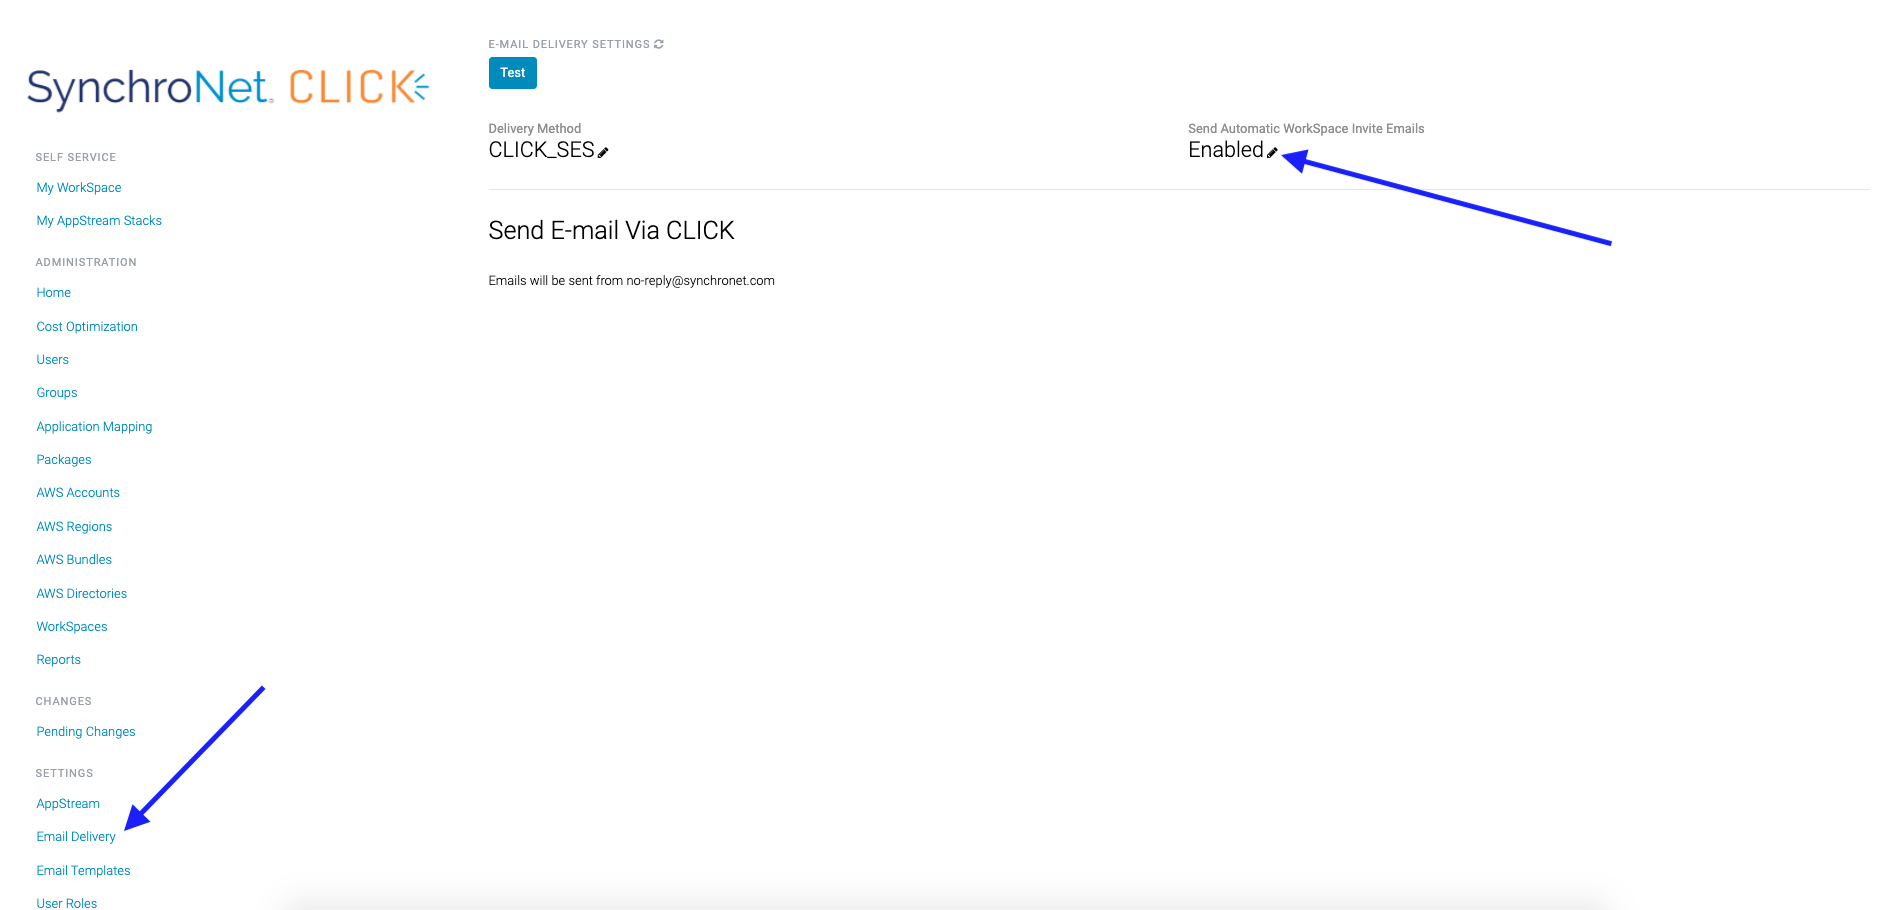
- Select the desired setting

- Click the check icon to save the changes.
How do I update my CLICK Cross Account Role?
Older instances
If your CLICK Instance was deployed before the introduction of multi-account/multi-region functionality (May 2019), do not follow this guide. Instead, please contact us at [email protected] to schedule an assisted update.
Sometimes CLICK needs new permissions into your AWS account to enable newly added features. This guide will help you upgrade the CloudFormation Stack that grants CLICK access to your AWS account.
Multiple accounts
If you have connected multiple AWS accounts to CLICK (on the AWS Accounts page of the CLICK Dashboard), you will need to perform these steps for each account.
Step 1: Identify the role to update
In the CLICK Dashboard, navigate to the AWS Accounts listing, then pull up the details for your account. Make note of the Cross-Account Role ARN value.
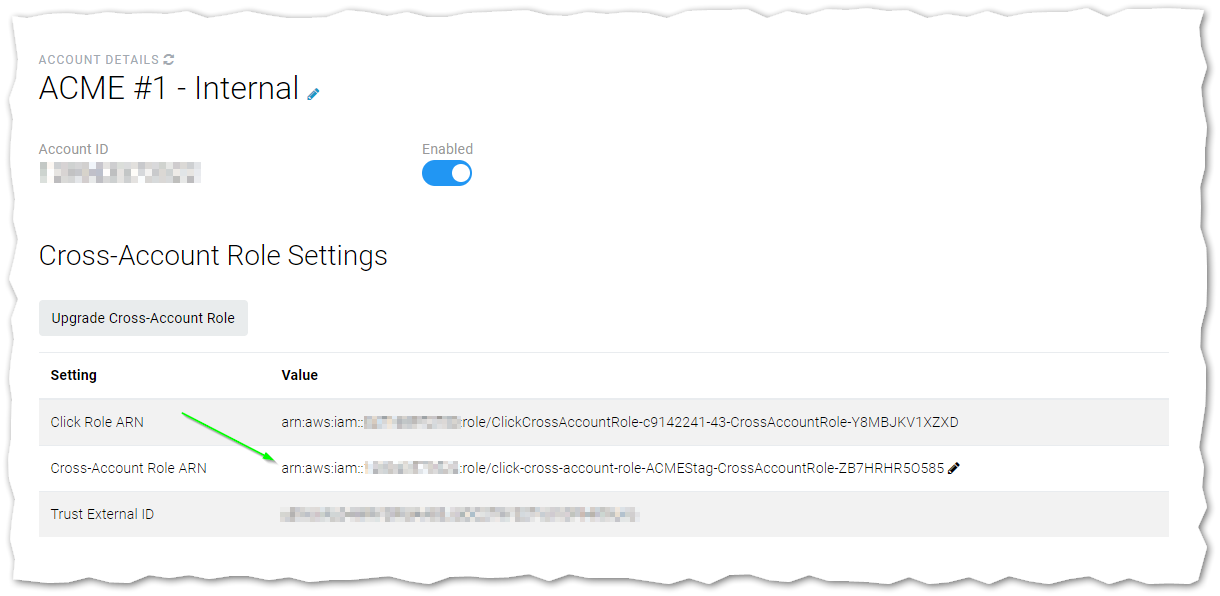
This is the ARN of the role whose permissions must be updated. Since the role was created by a CloudFormation stack, however, we don't want to update the role directly. We need to update the stack itself.
Step 2: Identify the stack to update
Log into the AWS Web Console with a user or role that has sufficient privileges to update CloudFormation stacks and modify IAM roles. Navigate to the CloudFormation service. You'll need to find the CloudFormation stack that created the role we identified above. The default name for CLICK's cross-account role CloudFormation stack is click-cross-account-role-<account name>, so you can start by searching for click-cross-account-role.
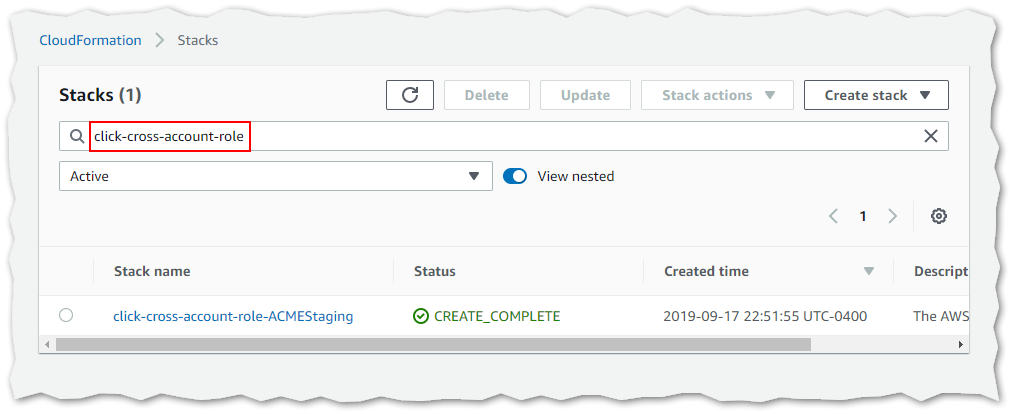
This is only the default value for the stack name. If you modified the name when deploying your cross-account role, you may not get any results from this search.
Once you think you've found the right stack, click on the stack name to view its details. Then, go to the Resources view and look for a resource with a type of AWS::IAM::Role and a Physical ID that matches the ARN of the role we identified in Step 1.

The CLICK cross-account role stack only has one resource. If you see multiple resources in this list, you haven't found the correct stack.
Step 3: Update the stack
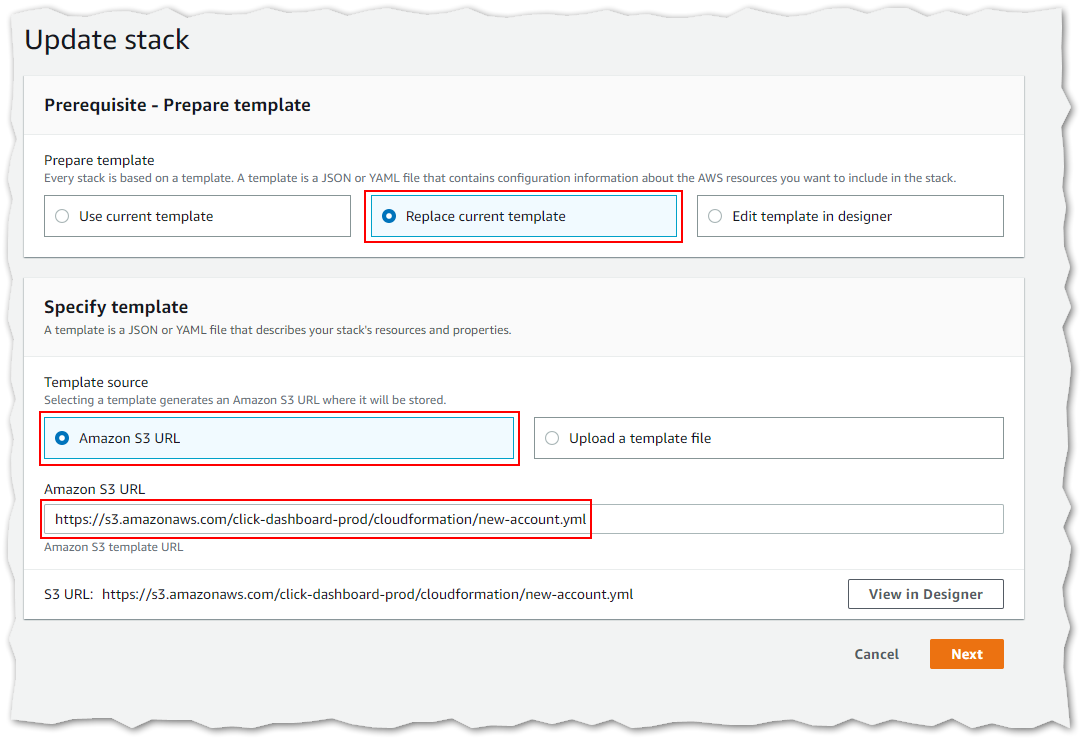
From the details view of the stack, click the Update button to begin the process of updating the stack.

On the next screen, choose the Replace current template option. A new section will appear allowing you to specify the new template. Leave the Amazon S3 URL radio button selected and enter the following in the text field. Click Next to continue.
https://s3.amazonaws.com/click-dashboard-prod/cloudformation/new-account.yml
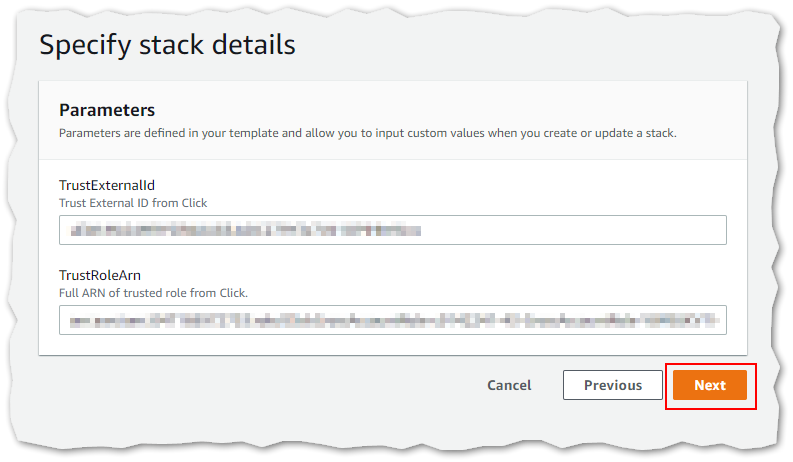
The next screen allows you to change the parameters that were given to the stack. Do not change these, and click Next to continue.
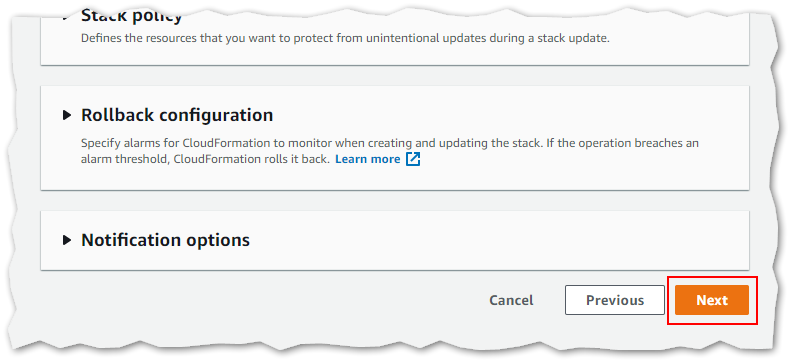
The next screen shows some advanced options. You should not need to change any of these. Click Next to continue.
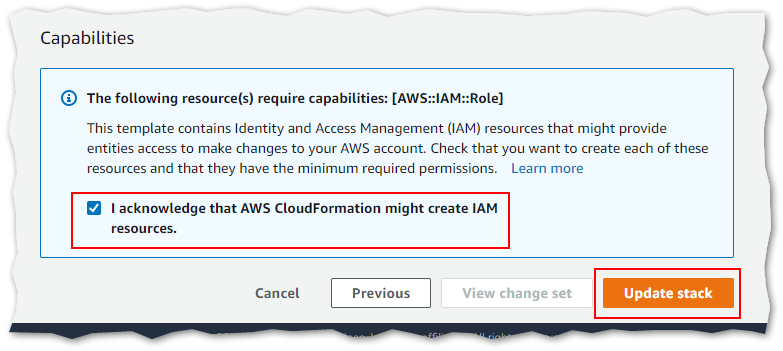
On the final screen, you will need to place a check in a checkbox acknowledging that the stack will create IAM resources. Then, click Update stack to deploy the updated role.
If you see an error stating that the submitted information didn't contain any changes, you have already deployed the latest version of the CLICK cross-account role template. There is no need for you to update your stack.

The stack should take less than 5 minutes to complete its updates.
CLICK Features
How do I perform actions on a WorkSpace?
To perform an action on a Workspace, follow the steps below.
-
Select the WorkSpaces menu item then select one or more checkboxes to select
Workspace(s) on which to perform an action. -
Select the Actions dropdown list.
-
Select the action to perform on the workspace.
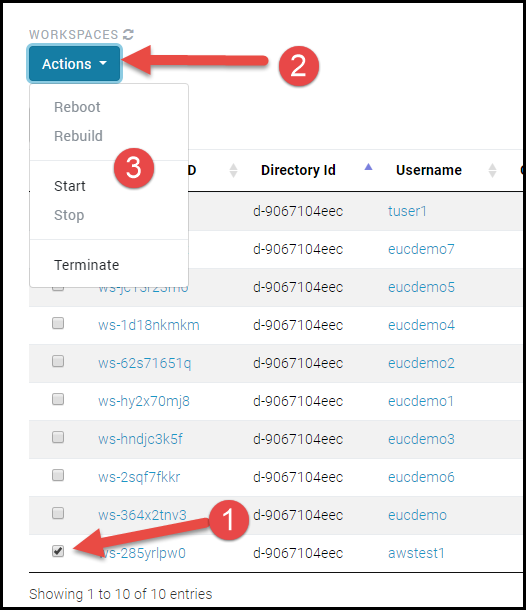
Note: If a workspace is terminated from the Workspaces data table as represented
above in the image, CLICK will attempt to recreate the WorkSpace for the user if
the Group with which the user is associated remains Managed by CLICK. To
terminate a WorkSpace permanently, the user must be removed from the Group in
Active Directory, or the entire Group must be un-managed from within CLICK. A
special consideration is given to the destructive nature of terminating
WorkSpaces from within CLICK. Even when automation is enabled (automatically
applying new or modification changes), CLICK will always require manual
administrator intervention to terminate a WorkSpace.
How do I offboard users?
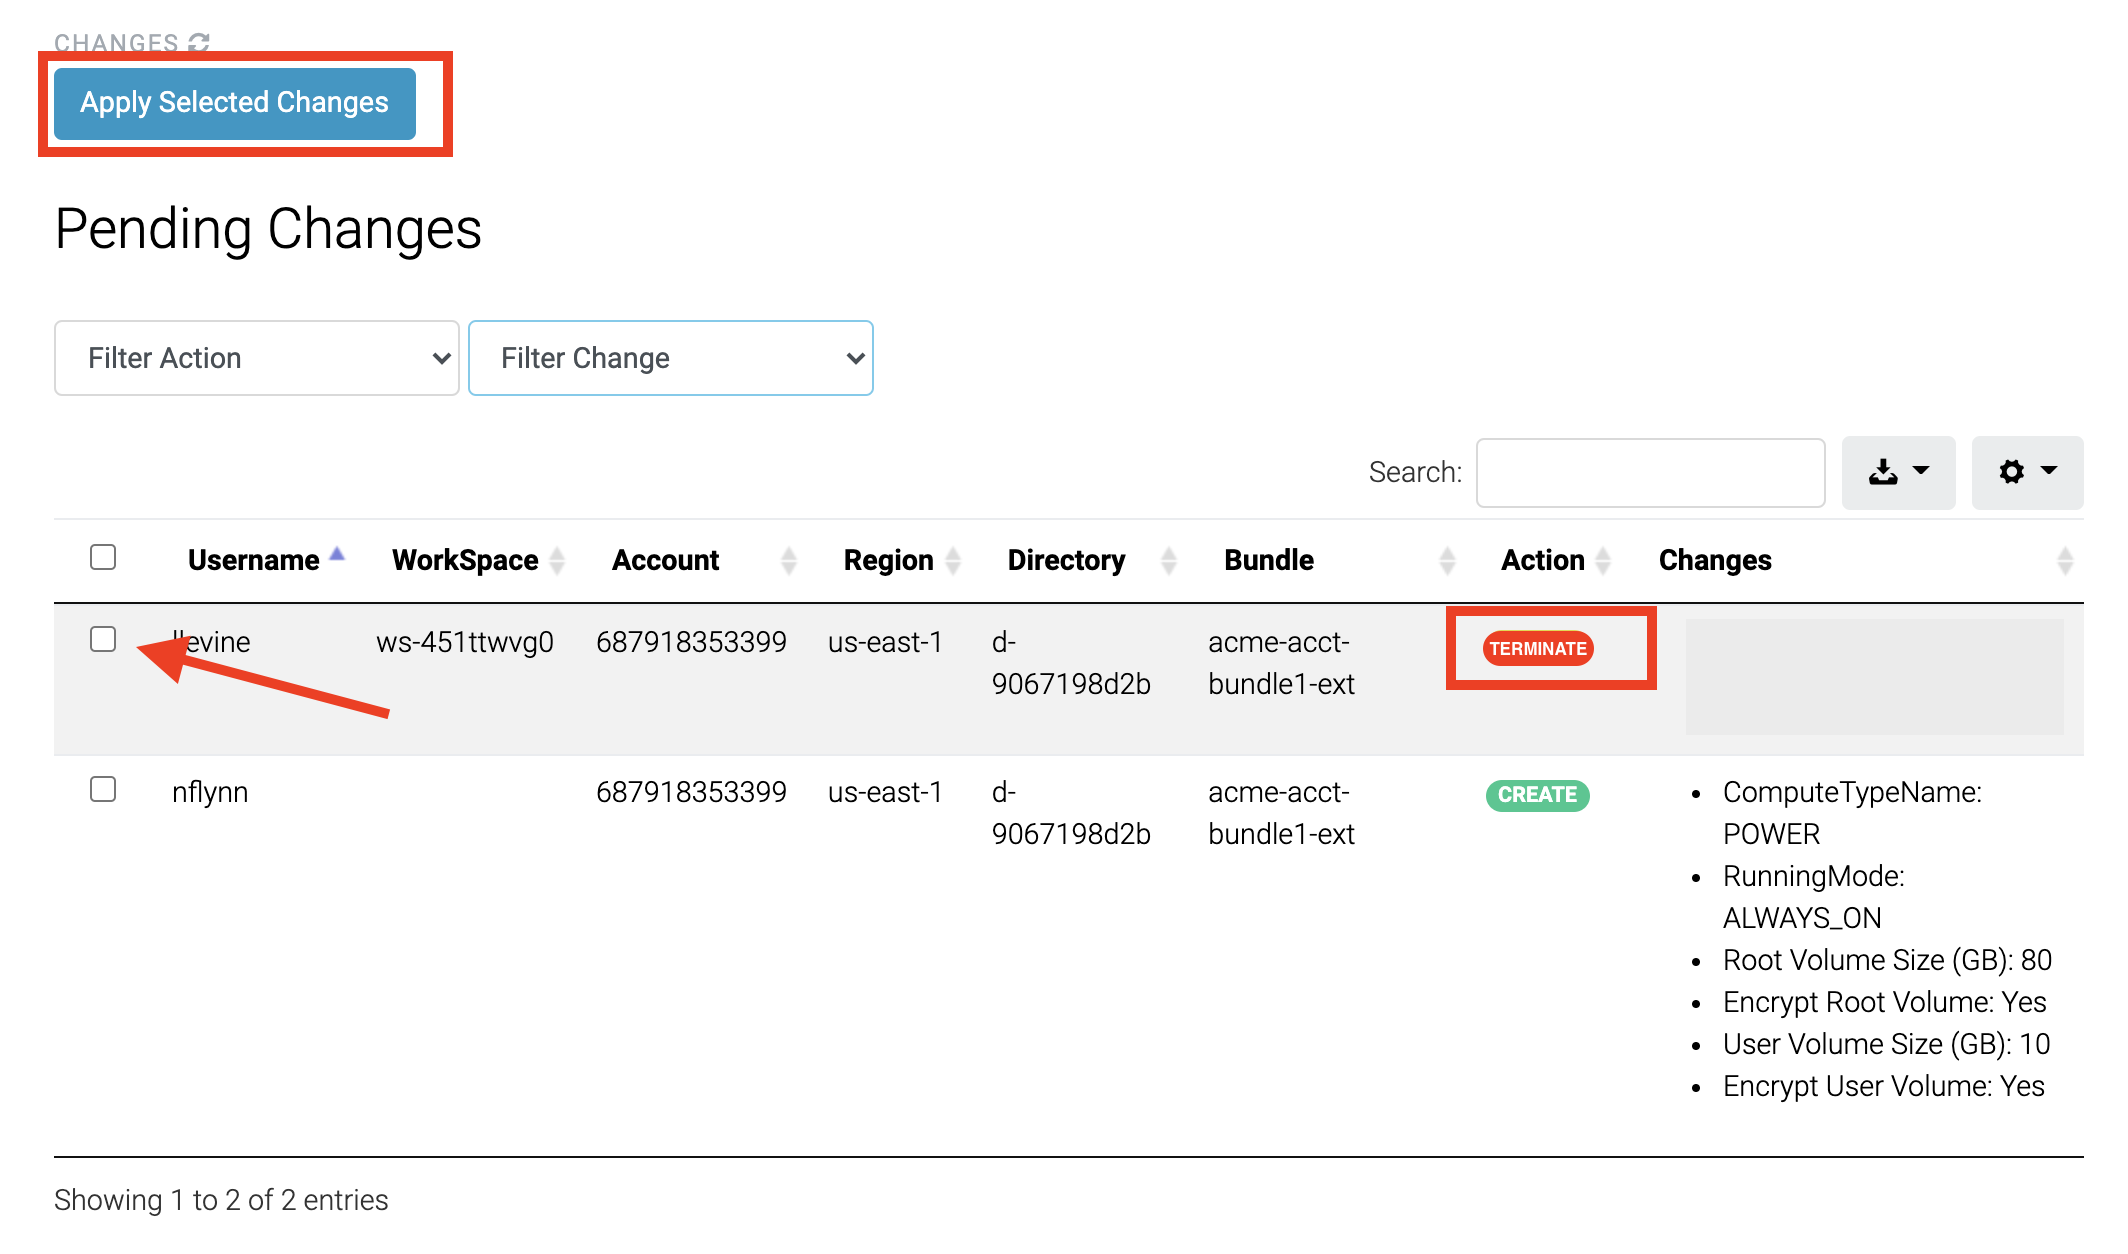
Terminating a WorkSpace is a destructive action that will require Administrator intervention from the Pending Changes screen.
When users no longer require a workspace, CLICK administrators may off board a user.
-
The process of removing a user and subsequently terminating their workspace
requires access to Active Directory as follows: -
Login to Active Directory Users and Computers.
-
Remove a user from a group that is managed by CLICK.
-
In the CLICK console, and select the Users menu.
-
Click the SYNC button.

-
Now Select the Pending Changes menu in the CLICK console.
-
The user’s WorkSpace will be put into a Stop state, then a Terminate state.
-
Select the checkbox by the user in the Pending Changes data table, then click Apply Selected Changes to terminate the WorkSpace.
Off-boarding a group of Users
When a group of users, such as contractors, no longer require a workspace, CLICK administrators may off-board a group of users.
The process of removing a group and subsequently terminating their workspace is a straightforward action as follows:
-
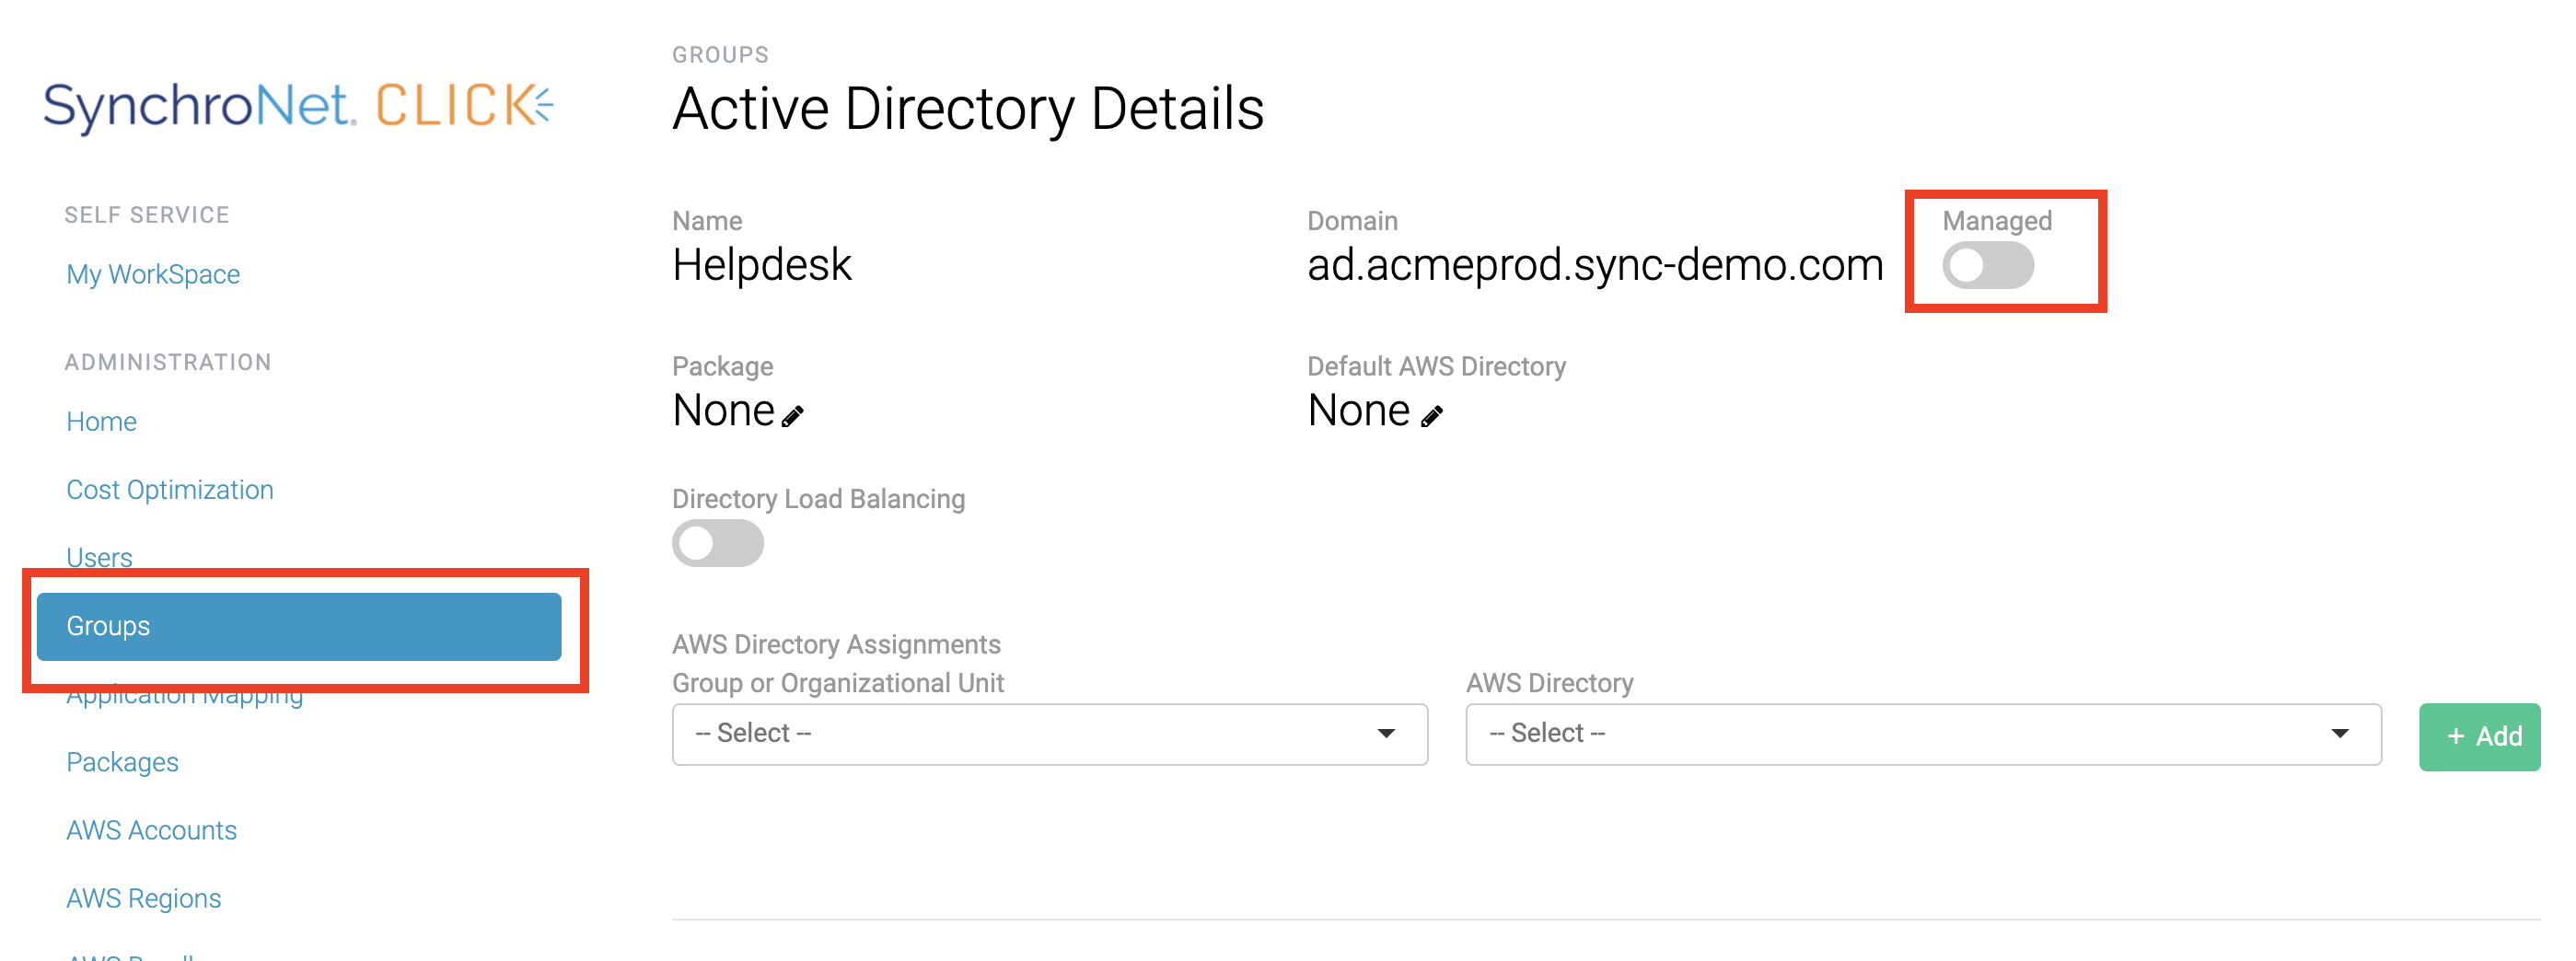
In the CLICK console, select the Groups menu.
-
Select the managed Group associated with the group of users requiring termination.
-
Click the blue Managed toggle button and it should turn gray.
-
Select the Pending Changes menu in the CLICK console
-
The user’s WorkSpace will be put into a Stop state, then a Terminate state.
-
Select the user in the Pending Changes data table, then click Apply Selected Changes to terminate the WorkSpaces.
CLICK portal shows a conflict when creating a new workspace.
- Ensure you do not have multiple packages assigned to the same workspace.
How does CLICK's Automated Cost Optimization work?
CLICK's automation will determine whether or not your fleet is optimized by calculating the billing and hourly usage of the WorkSpaces in your environment and using that calculation to convert your WorkSpaces running modes. There are two main ways CLICK can automate costs for your WorkSpaces, either or both can be enabled in your Cost Optimization Settings.
Visit our Automated Cost Optimization Guide for more details.
What is AD-less CLICK?
For those organizations where third-party access to their AD is not possible, or perhaps an existing AD environment is incredibly complex and can cause performance and/or connectivity issues with third-party tools, SynchroNet has introduced a new option in its CLICK 4.0 release. AD-less CLICK will allow CLICK to manage your WorkSpaces environment by proxy. In short, we can mirror and manage your AD user base without needing to grant CLICK access to actually query your Active Directory environment.
Learn more by visiting our AD-Less CLICK Guide.
CLICK Support
How do I reach out to SynchroNet for support?
- E-mail: [email protected]
- Phone: 1-877-952-0104
SynchroNet's normal operating hours are Monday through Friday, 8:00 AM - 5:00 PM US Central Time. If you need immediate support outside of normal operating hours, please call the phone number above.
Learn about our Service Level Agreement and support ticket best practices by visiting our CLICK Support page.
How long can I expect to wait for a support response?
High Priority Issues
To ensure that high priority issues are treated promptly, especially after hours, we require all Priority-1 and Priority-2 issues to be submitted by phone. A SynchroNet Engineer will return your phone call per the 'Initial Response' targets listed below.
IMPORTANT: It is imperative when calling that a call-back number and contact name is provided, and that contact is available to receive a return phone call.
  <th>
    Description
  </th>

  <th>
    Initial Response
  </th>

  <th>
    Progress Updates (via ticket)
  </th>

  <th>
    Contact
  </th>
</tr>
  <td>
    Critical services or functions not operational and/or business is stopped

    More than **25% of users** impacted

    Dedicated resources required **immediately**
  </td>

  <td>
    Less than **30 minutes**
  </td>

  <td>
    **Hourly**
  </td>

  <td>
    Phone
  </td>
</tr>

<tr>
  <td>
    2 - High
  </td>

  <td>
    Critical services or functions are degraded. Business is operational, but heavily degraded

    More than **15% of users** impacted and/or service scope impact is **severe**
  </td>

  <td>
    Less than **1 hour**
  </td>

  <td>
    **Hourly**
  </td>

  <td>
    Phone
  </td>
</tr>

<tr>
  <td>
    3 - Medium
  </td>

  <td>
    Limited Impact issue

    Less than **5% of users** impacted and/or service scope impact is **minimal**
  </td>

  <td>
    Less than **8 hours**
  </td>

  <td>
    Within **3 business days**
  </td>

  <td>
    E-mail
  </td>
</tr>

<tr>
  <td>
    4 - Low
  </td>

  <td>
    The reported anomaly in the system does not substantially restrict the use of one or more features of the product to perform necessary business functions
  </td>

  <td>
    Less than **24 hours**
  </td>

  <td>
    Within **5 business days**
  </td>

  <td>
    E-mail
  </td>
</tr>
| Priority |
|---|
| 1 - Critical |
Please visit our CLICK Support page for guidance on submitting a support ticket properly.
I need immediate assistance for a critical issue, how do I reach immediate, dedicated support?
Priority 1 - Critical and Priority 2 - High are considered as follows and must be reported via phone at 1-877-952-0104:
  <th>
    Description
  </th>

  <th>
    Initial Response
  </th>

  <th>
    Progress
  </th>
</tr>
  <td>
    Critical services or functions not operational and/or business is stopped

    More than **25% of users impacted**

    Dedicated resources required **immediately**
  </td>

  <td>
    Less than **30 minutes**
  </td>

  <td>
    **hourly**
  </td>
</tr>

<tr>
  <td>
    2 - High
  </td>

  <td>
    Critical services or functions are degraded. Business is operational, but heavily degraded

    More than **15% of users impacted** and/or service scope impact is **severe**
  </td>

  <td>
    Less than **1 hour**
  </td>

  <td>
    **Hourly**
  </td>
</tr>
| Priority |
|---|
| 1 - Critical |
IMPORTANT: It is imperative when calling that a call-back number and contact name is provided, and that contact is available to receive a return phone call.
Please visit our CLICK Support page for more details on how to successfully submit a support ticket.
How do I enable access for SynchroNet reporting?
SynchroNet works closely with many of our customers to provide custom reports and recommendations. In order to do this, SynchroNet requires read-only access to the data in your CLICK Instance. Below are the steps you will need to follow to enable this access.
Step 1: Create a custom role
Custom roles in CLICK allow you to control which resources can be accessed within CLICK. For a reporting/analysis user, we only want to grant read access, and only to the specific resources necessary for those purposes.
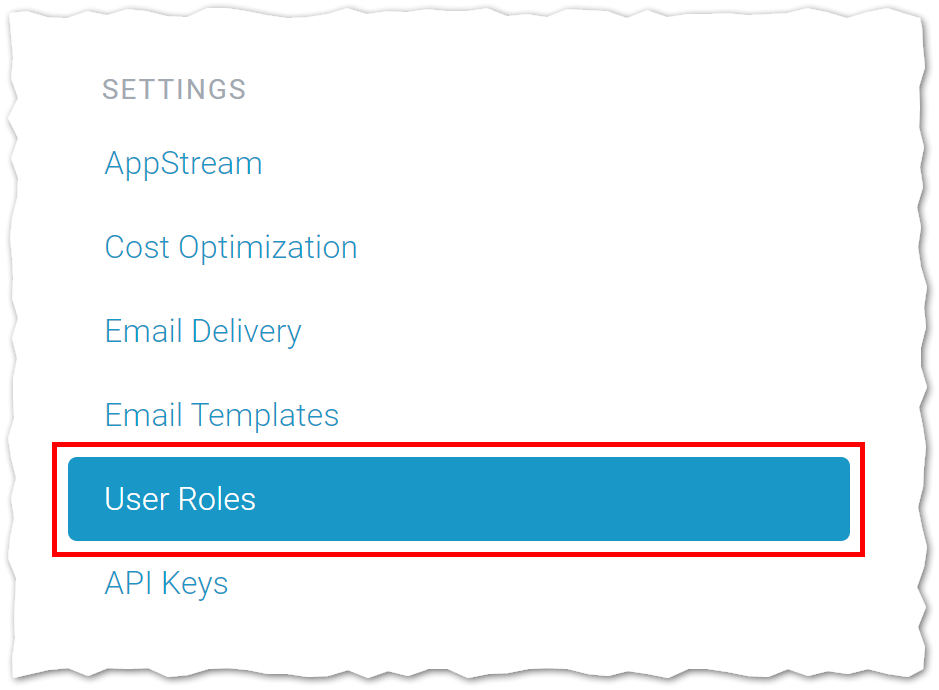
To access the User Roles list, click on the User Roles item in the left-hand navigation menu.
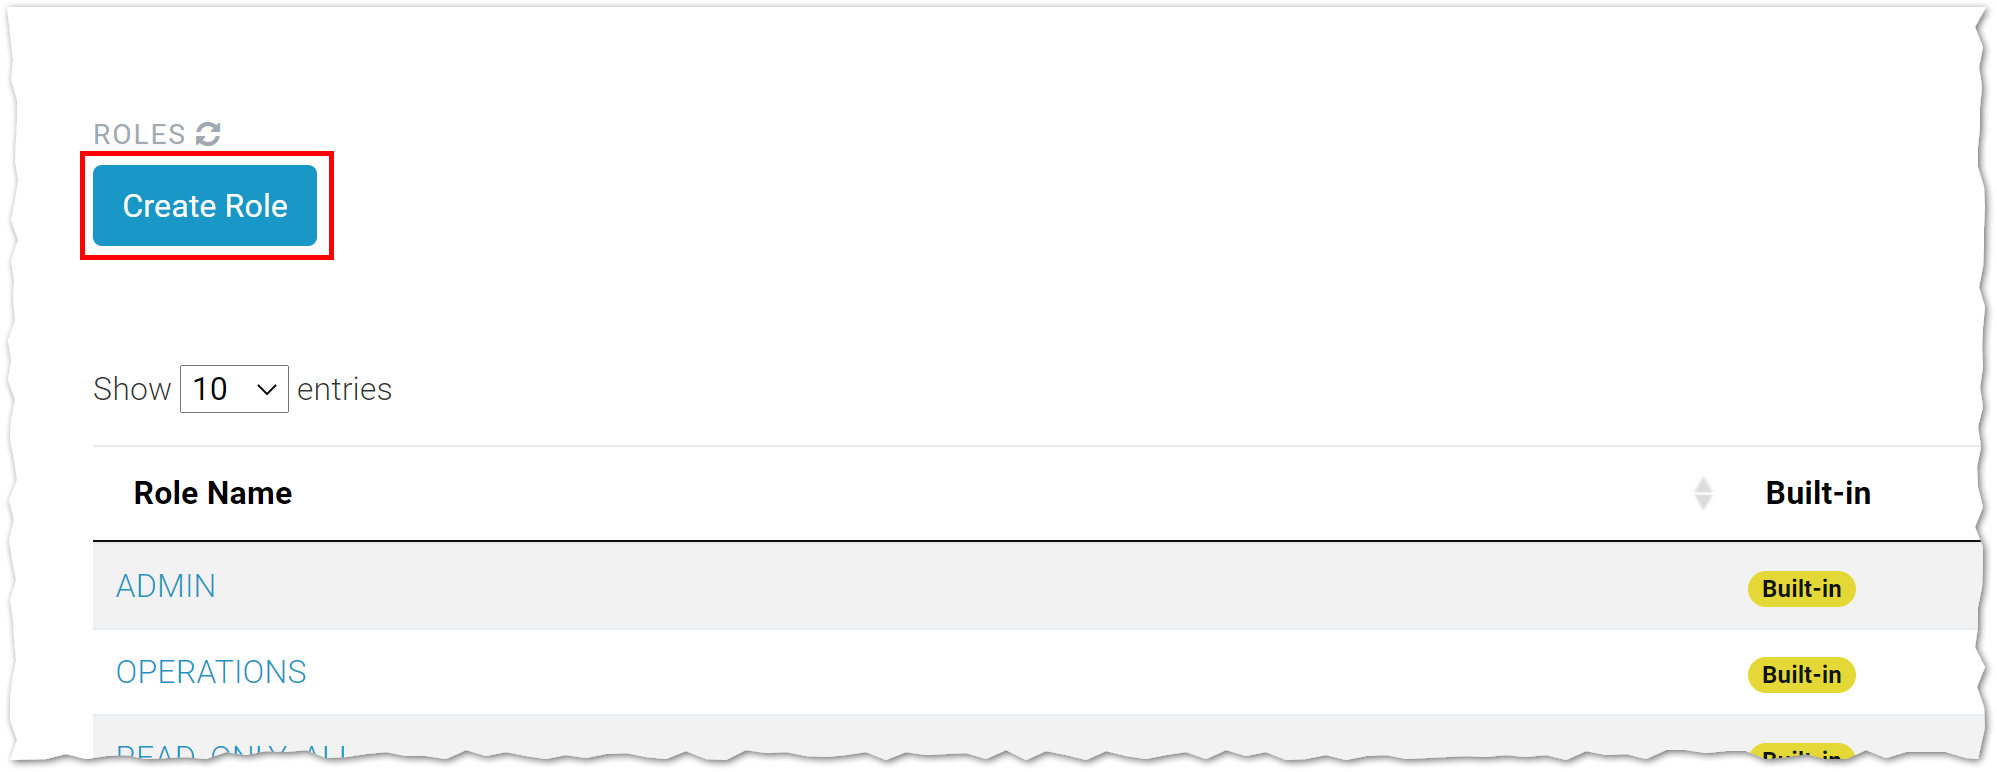
Once on the User Roles list, you will see the built-in CLICK roles as well as any other custom roles you have already created. Click the Create Role button to create a new role.
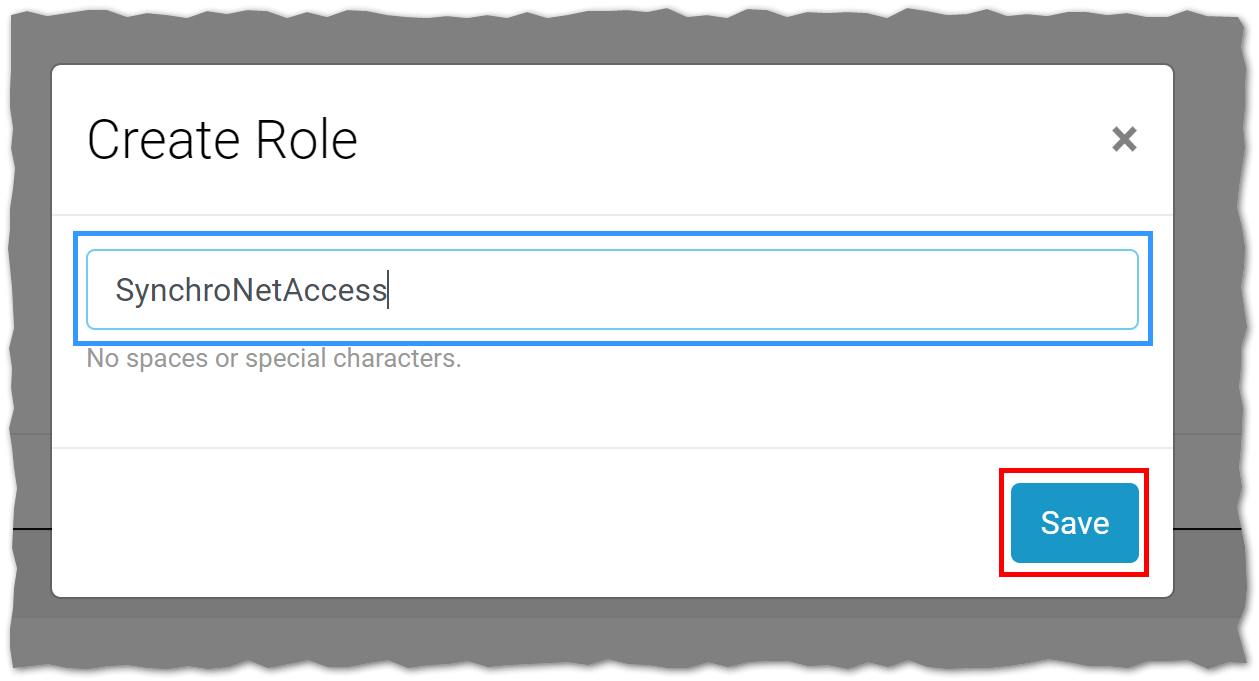
On the dialog that appears, type in a name and click the Save button.
On the next page, you will see the list of available resources to grant access to. Find the workspace row and place a check in the first of the two checkboxes. This grants read-only access to the WorkSpaces list and WorkSpace detail pages.

Finally, scroll to the bottom of the page and click the Save Permissions button. Your custom role is complete and ready to use!

Step 2: Create an API key
The second step to granting access is to create an API key with the permissions defined by the role you defined in Step 1.
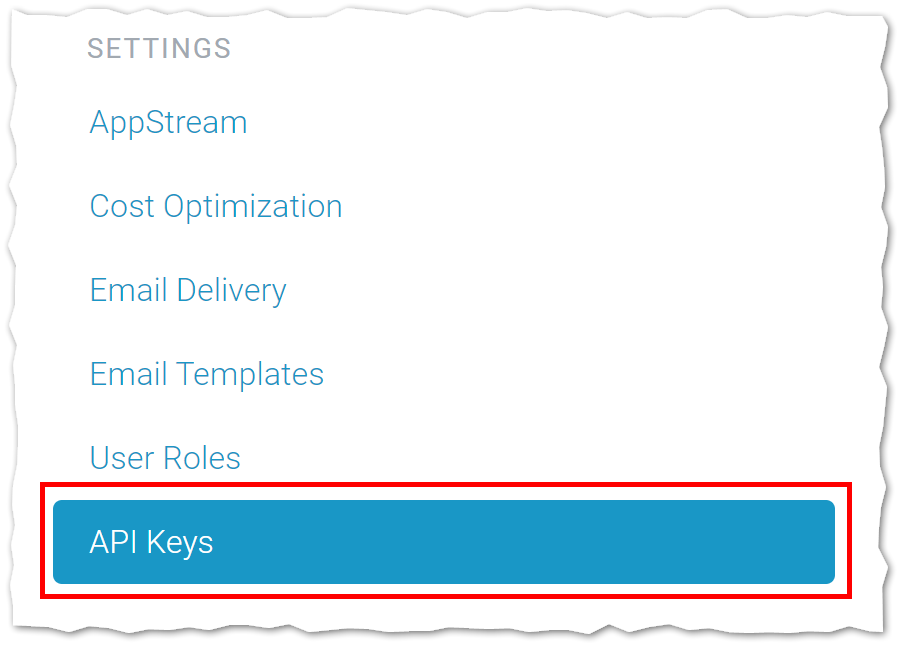
Begin by clicking on the API Keys item in the left-hand navigation menu.
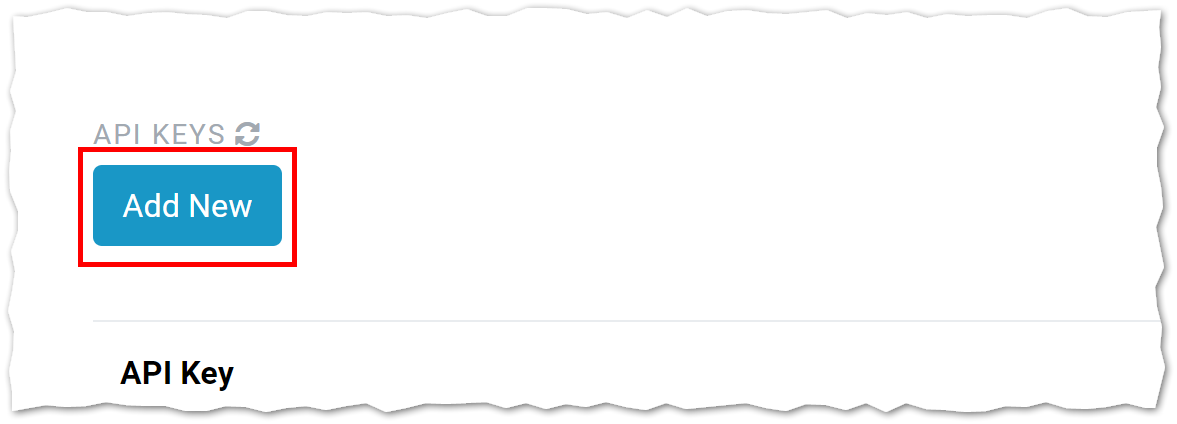
On the API Keys list, click on the Add New button.
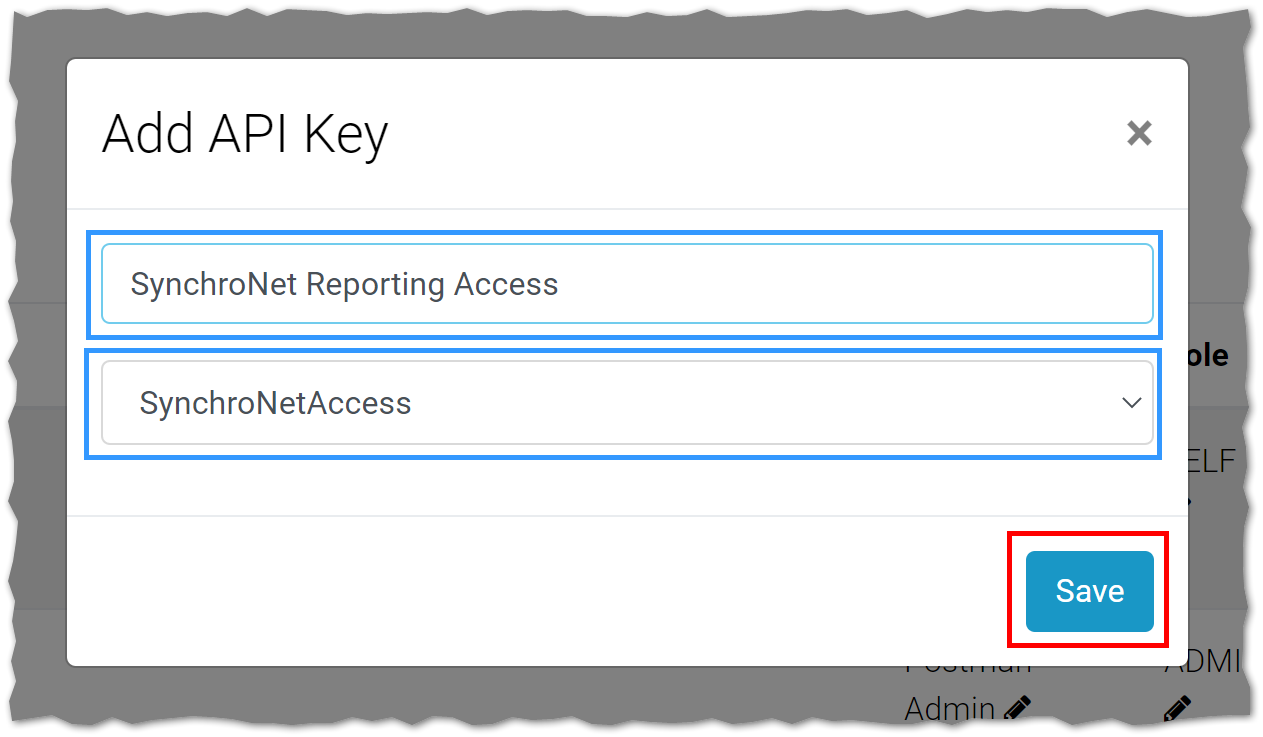
In the dialog that appears, give the API Key a description and select the User Role you created from the dropdown below. Then, click the Save button.
Your new API Key has been created and is ready to use.
Provide SynchroNet with API key
On the API Key list screen, find the API Key you created in Step 2, and click the Show/Hide button to make the key visible.

The key will appear beneath the Show/Hide button. This is the value you must provide to SynchroNet to grant access for custom reporting and analysis.
Communicate Securely!
We strongly recommend using a secure, encrypted channel to communicate the API Key, and all sensitive data. If you do not have a method for doing this, talk to your SynchroNet contact about initiating an encrypted e-mail thread.
Marketplace
How do I upgrade my subscription?
How do I apply a new subscription to an existing CLICK instance?
You may need to apply a CLICK subscription to an existing CLICK instance if your subscription has expired or a private offer has expired.
Make sure you're logged in to the AWS account that was used when you initially set up your CLICK instance and that you wish to be billed under.
- Go to the Marketplace and choose your desired subscription to CLICK.
If you already had a CLICK subscription but it has expired go to the Marketplace and navigate to manage subscriptions from the top menu button. Find your SynchroNet CLICK subscription and update your subscription.
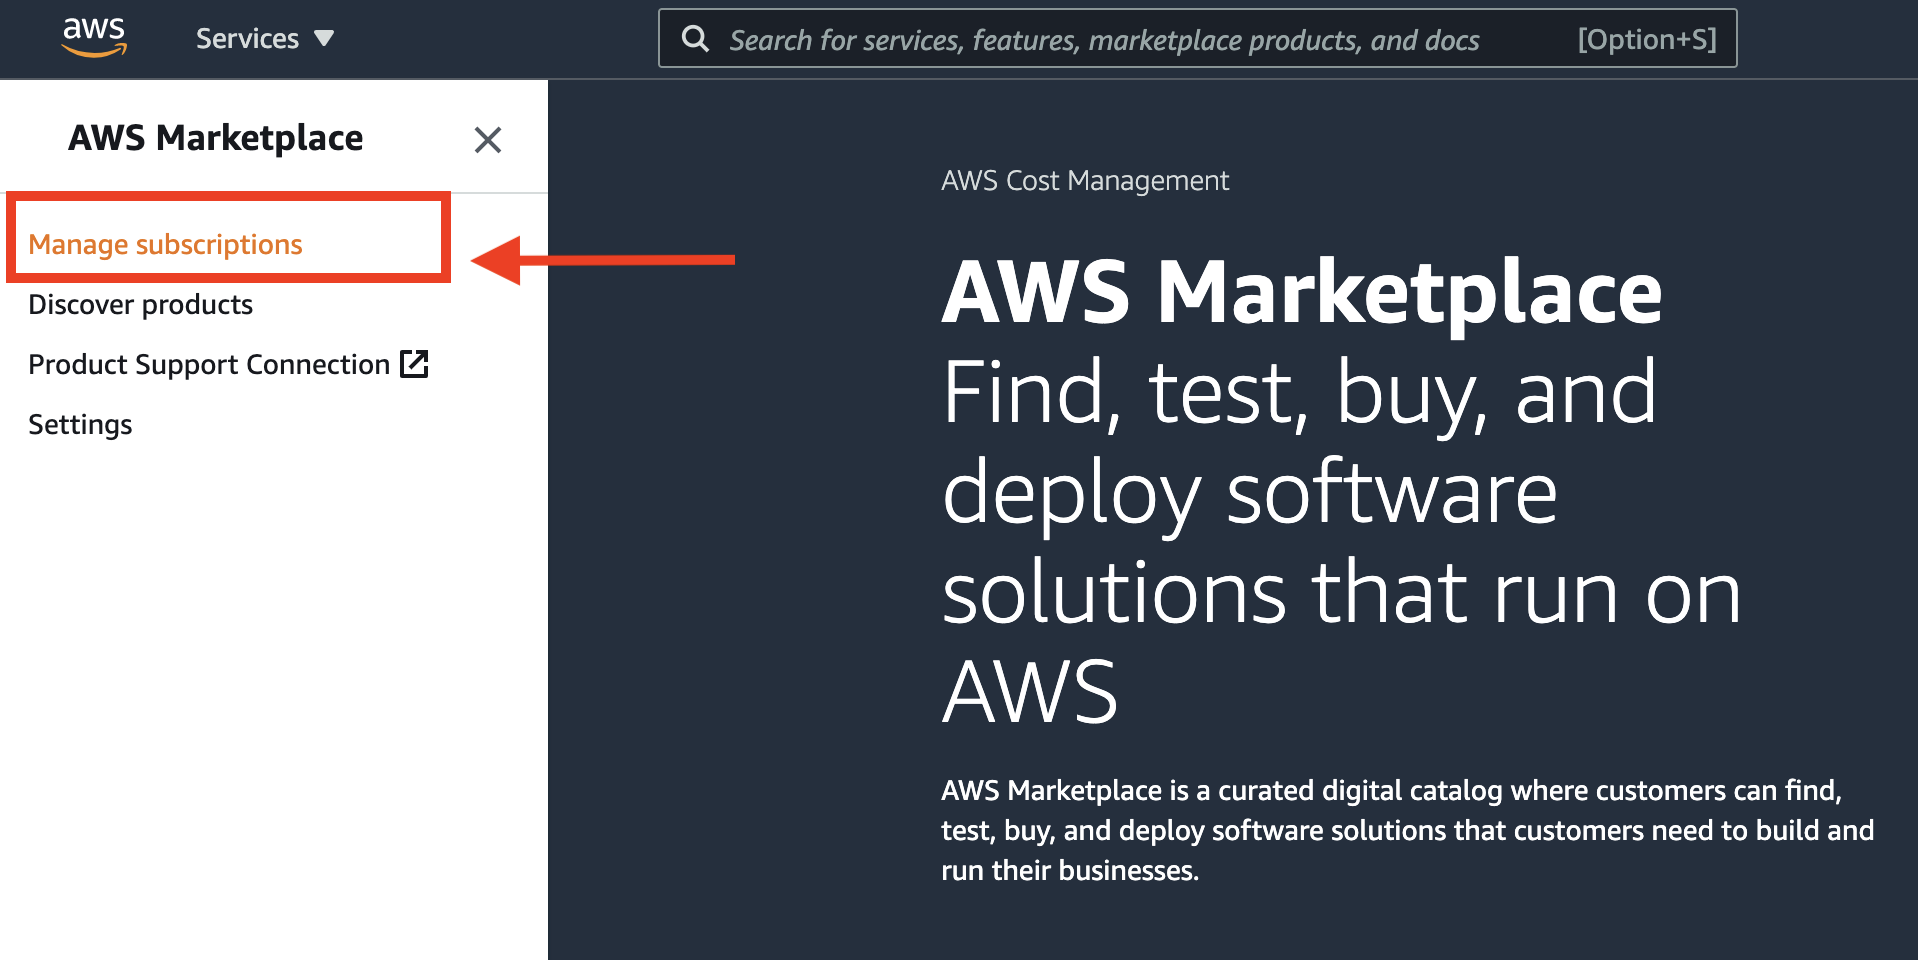 Marketplace manage subscriptions
-
Once you've subscribed to CLICK in the Marketplace, you will be redirected to the SynchroNet Customer Portal where you will log in using the email and password for your SynchroNet account.
-
With every new subscription you will be taken through the SynchroNet CLICK registration wizard, instead of creating a new CLICK instance, you will apply subscription to an existing instance.
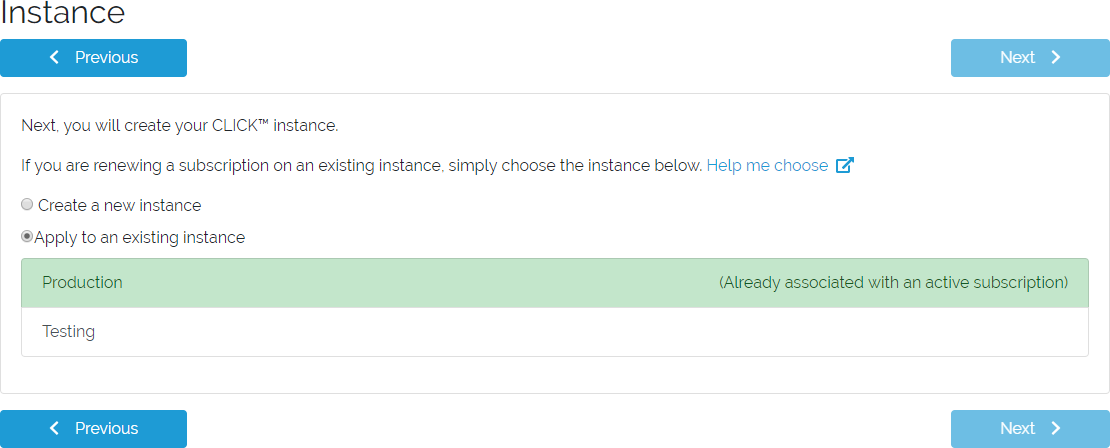 CLICK instance selection
If your subscription has expired you will be able to select an existing instance. If you are applying a brand new subscription to an existing instance you must first be sure the previous subscription has expired or has been manually canceled through the Marketplace. Only one Marketplace subscription can be applied to a CLICK instance at a time.
- Once the subscription has been applied to the existing instance, all existing information related to that instance will be restored and you can continue to use CLICK as your normally would.
Updated 8 months ago
