Configure WorkSpaces Migration
WorkSpaces Migration Overview
Amazon WorkSpaces can be migrated between bundles. SynchroNet CLICK helps initiate these migrations based on user Active Directory (AD) group membership and package assignments. This simplifies and automates most of the tasks related to migrating WorkSpaces between bundles.
Migration is a Destructive Action
- The source WorkSpace's Root Volume (C: on Windows), such as installed software, configuration, and documents are lost in this process with no option for a restore. The new WorkSpace's Root Volume will use the new bundle's image.
- The source WorkSpace's User Volume (D: on Windows) is recreated from the most recent snapshot of the source WorkSpace's User Volume. The old user profile is renamed, and then certain files in the old user profile are moved to the new user profile.
- Migrated WorkSpaces will have a new hostname, IP address, MAC Address, and WorkSpace ID.
- The migration process can take up to one hour per WorkSpace.
- If an error occurs that prevents successful migration, the original WorkSpace is recovered and returned to its original state, and the new WorkSpace is terminated.
- Full details of what happens during a WorkSpaces migration can be reviewed in the Amazon WorkSpaces Administration Guide
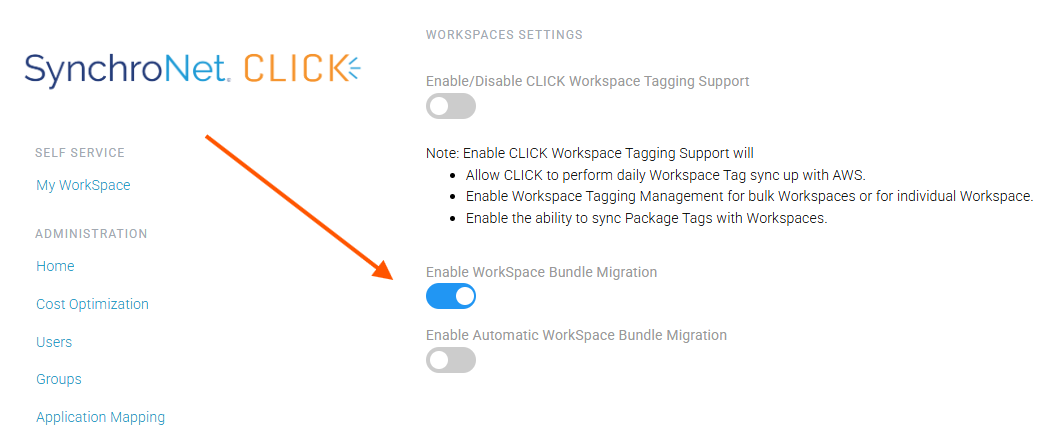
Enable WorkSpaces Migration
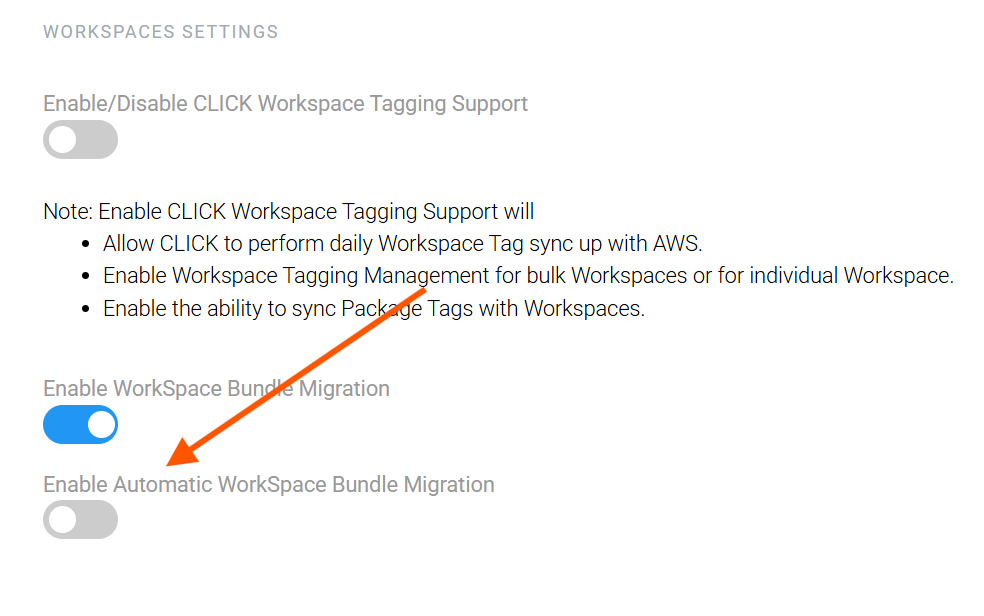
To enable WorkSpaces Migration in CLICK, navigate to Settings > WorkSpaces in the SynchroNet CLICK console. Toggle the slider for "Enable WorkSpace Bundle Migration". This feature is disabled by default.
Package Assignment for Migration
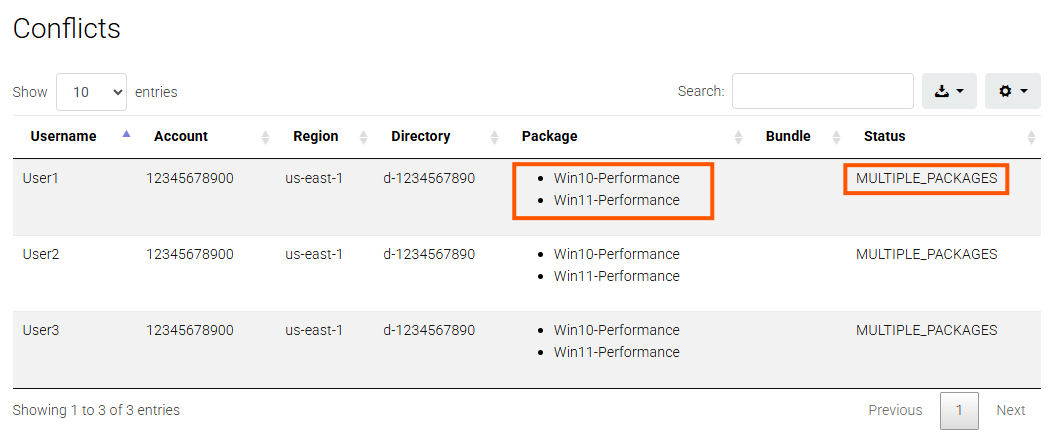
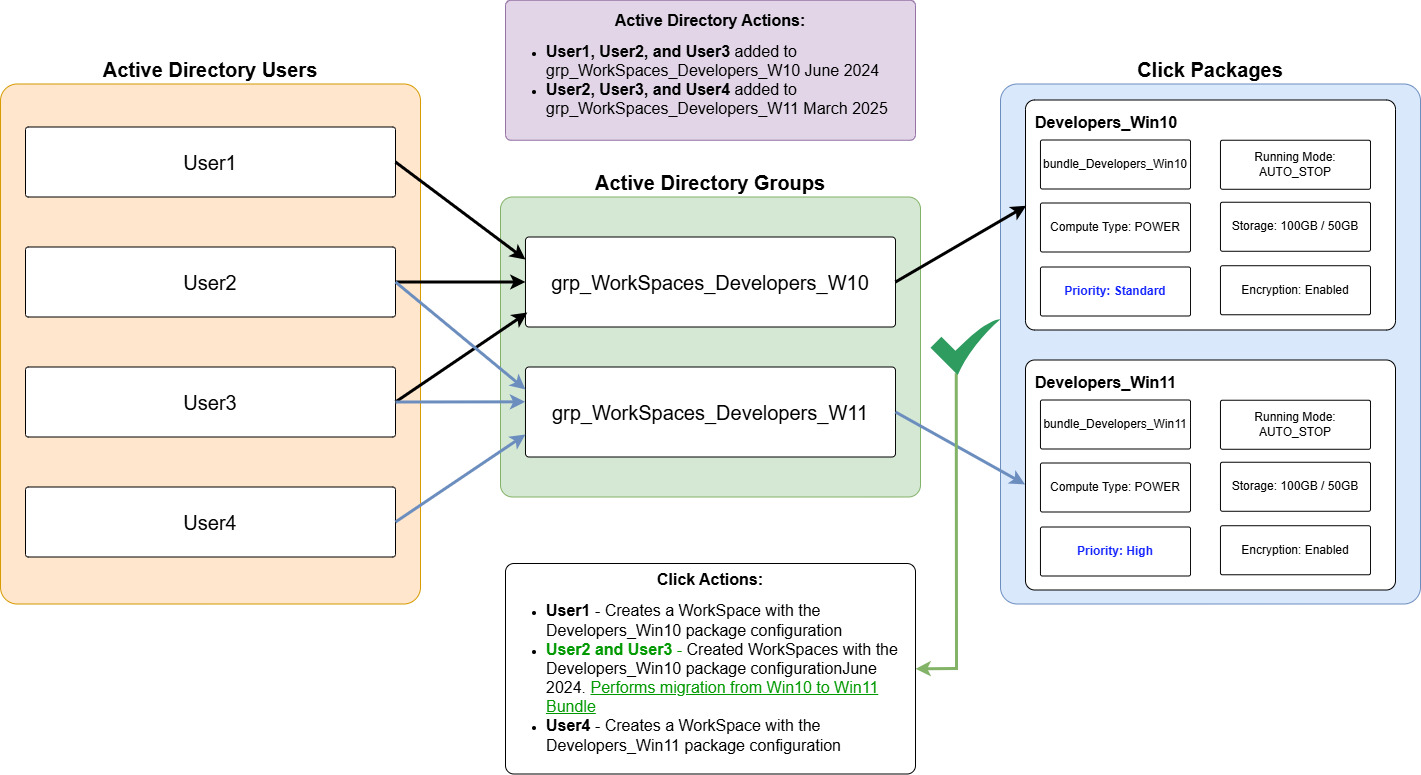
SynchroNet CLICK can use Package Assignments to identify WorkSpaces to migrate between bundles. With Bundle Migration disabled, CLICK flags any users assigned multiple packages and will not take any actions.
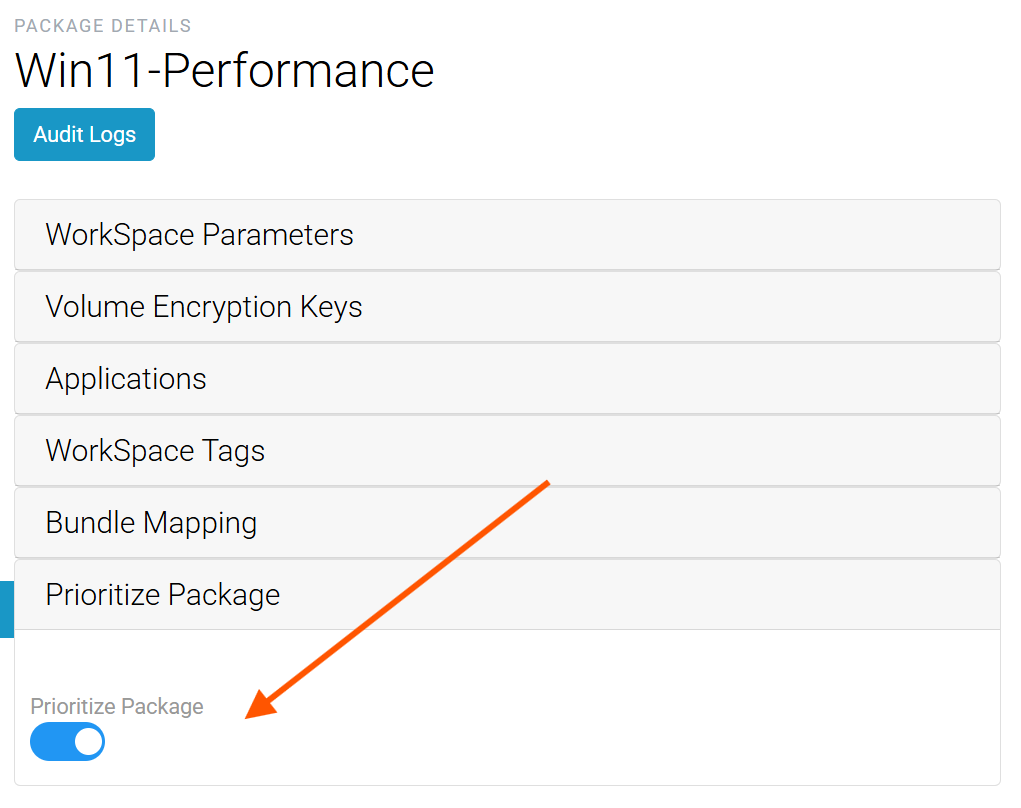
When Bundle Migration is enabled in CLICK, you can mark a package as "Prioritized". When a user is assigned multiple packages but one has the prioritized flag enabled, CLICK will add the WorkSpace to the Pending Changes queue to allow migration. This will migrate WorkSpaces to the new Bundle which is part of the Package where Prioritize Package is enabled.
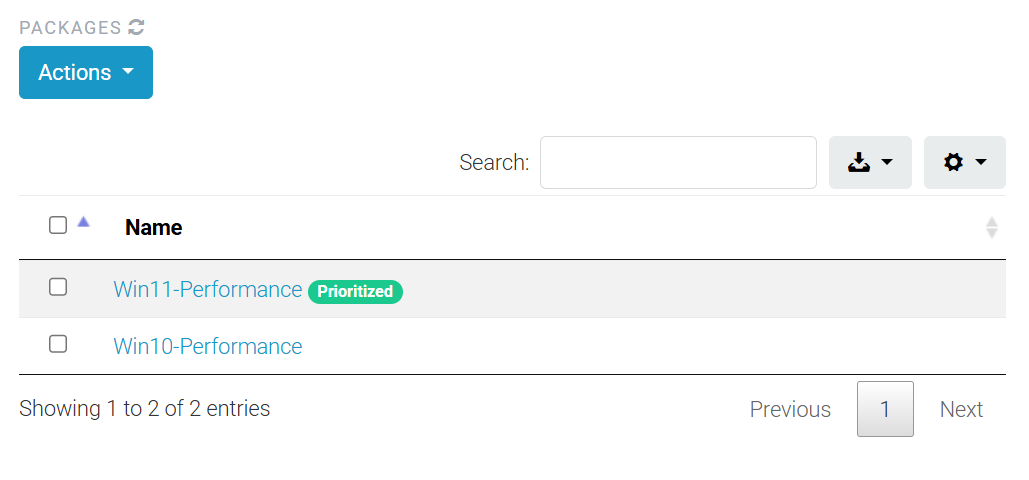
To configure a package to be prioritized, open the package settings and toggle the "Prioritize Package" slider. It will show a "Prioritized" marker on the package page.
Enabling Package Priority
Package "Prioritized" Flag
How WorkSpaces Migration Works with CLICK
Migration is considered a destructive action, so CLICK's default behavior is to require an administrator to manually initiate all migrations. You may enable "Automatic Bundle Migration" to approve CLICK to automatically perform a migrate action against any WorkSpaces without administrator approval.
There are two conditions where CLICK will identify a WorkSpace for migration. You can change an existing package to use a new bundle, or you can assign multiple packages and use the Package Priority feature to choose which package and bundle to migrate users to. If either of these conditions are met, CLICK will add that WorkSpace to the Pending Changes section of the CLICK console.
Which option should I use?
If you are going to migrate all users at once, modifying a package's bundle is the recommended way to complete a migration.
If you are planning on migrating users in waves, you should create a new Active Directory group and CLICK package with the package priority flag enabled to control which users' WorkSpaces are migrated.
Perform a Migration
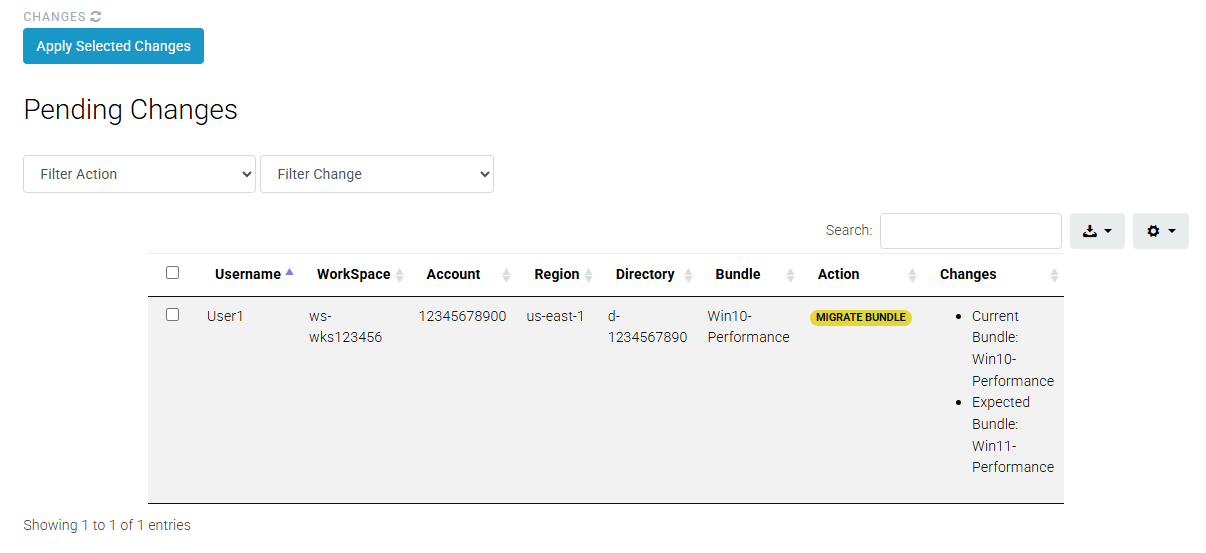
Example Migrate Change
-
Confirm all details about the identified WorkSpaces, such as the username, WorkSpace ID, region, and the current and expected bundles.
-
Check the box next to the WorkSpace(s) to migrate.
-
Click "Apply Selected Changes" at the top of the screen.
-
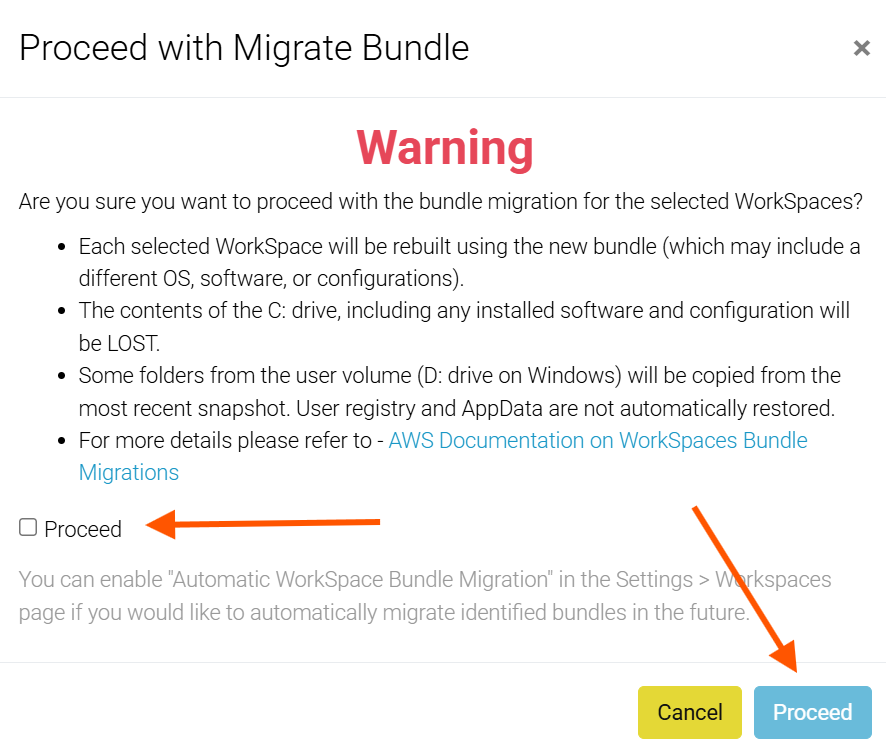
Review the warning about the impact of a migration. Once reviewed, check the box next to "Proceed" and then click "Proceed" if you understand and accept.
-
The WorkSpace(s) will be queued for migration. Migration may take up to one hour to complete.
Automatic WorkSpaces Migration
Automatic WorkSpaces Migration is disabled by default in your CLICK environment.
Migration is a Destructive Action
- When Automatic WorkSpaces Migration is enabled, CLICK will automatically perform a migration on any WorkSpaces identified as needing a new bundle. No administrator intervention is required, enable this feature with caution. This will apply to your entire CLICK environment.
- The source WorkSpace's Root Volume (C: on Windows), such as installed software, configuration, and documents are lost in this process with no option for a restore. The new WorkSpace's Root Volume will use the new bundle's image.
- The source WorkSpace's User Volume (D: on Windows) is recreated from the most recent snapshot of the source WorkSpace's User Volume. The old user profile is renamed, and then certain files in the old user profile are moved to the new user profile.
- Migrated WorkSpaces will have a new hostname, IP address, MAC Address, and WorkSpace ID.
- The migration process can take up to one hour per WorkSpace.
- If an error occurs that prevents successful migration, the original WorkSpace is recovered and returned to its original state, and the new WorkSpace is terminated.
- Full details of what happens during a WorkSpaces migration can be reviewed in the Amazon WorkSpaces Administration Guide
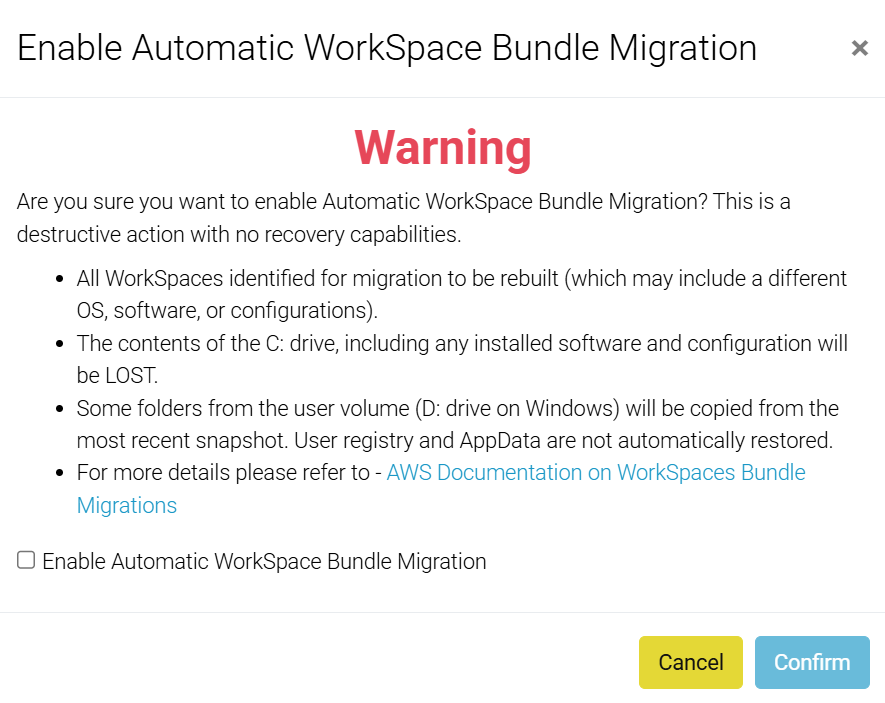
Enabling Automatic WorkSpaces Migration
-
In the CLICK console, navigate to Settings > WorkSpaces
-
Click the toggle for "Enable Automatic WorkSpace Bundle Migration"

-
Review the warning about the impact of enabling Automatic WorkSpace Bundle Migration". Once reviewed, check the box next to "Enable Automatic WorkSpace Bundle Migration" and click Confirm if you understand and accept.

Updated about 1 year ago